
It is absolutely no coincidence on the holidays. It is customary to give postcards - they can write wishes and kind words in them, and a pleasant design will show a true attitude and raise the mood. The postcard can be a supplement to any gift or even replace it. Now they are fashionable to do it with their own hands - after all, it is possible to create a unique, unusual handicraft with the help of girlfriend.
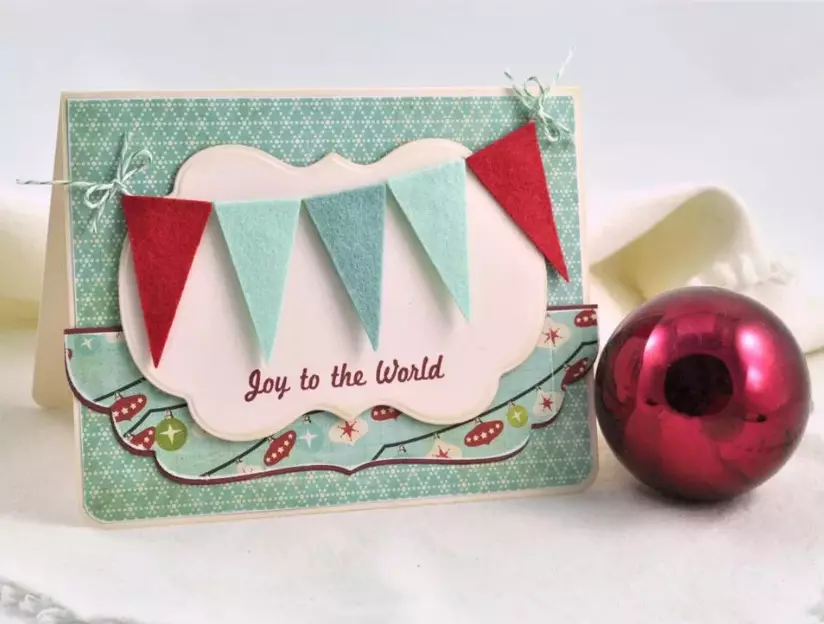
Birthday crafts
The main plus of the homemade postcard is that When it is created, you can navigate exactly the birthday girl - His character, habits, taste, sense of humor. It can be used both ordinary paper and corrugated, velvet, brilliant and even kraft. The main thing is that all the details fit into the selected concept.Volume with gift
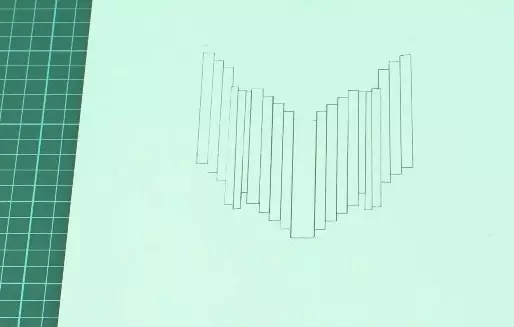
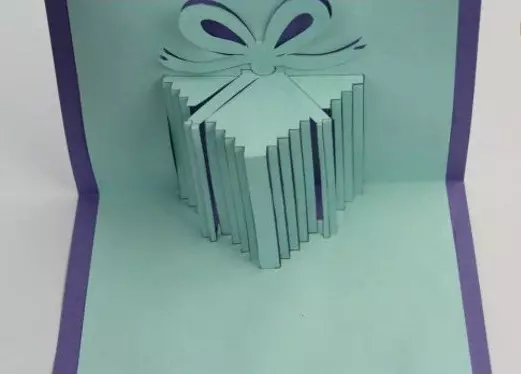
Initekly, postcards transforming into a bulk figure look like. An ideal decoration for the birthday will be a design in the form of a gift box. The phased manufacturing scheme will help in creating a postcard.
- The postcard will consist of two sheets. The color of the inner sheet can be identical outward or contrast. It is necessary to apply a gift drawing so that the two lower angle, located on the diagonal, fled. You can find the appropriate image on the Internet and print on colored paper.
- Then using the stationery knife you need cut through all vertical lines on the box and cut the bow.
- So that the gift box looked bulk - It is necessary to bend all horizontal faces and paste on the wrong side of the external sheet, not a touch area with slots.
There is another simplified version with which even children will cope.
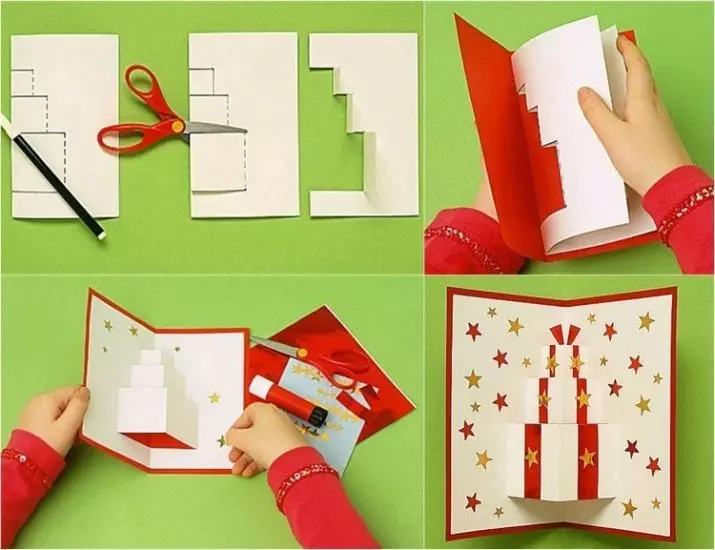
- The inner sheet needs to be folded in half and draw half of gifts, where the upper must be one cm smaller. Thus, during the reversal, a stack of gift boxes will turn out.
- With scissors need cut out horizontal lines.
- The resulting strips wrap the sideways to schedule the lines of the side folds . Expand the sheet and reap the cutting parts on the other side of the paper. To glue the sheets, bypassing the area of gifts so that they are freely straightened.
The front side of the folding card can be decorated at its discretion - in the subject of the holiday or the corresponding inscription.
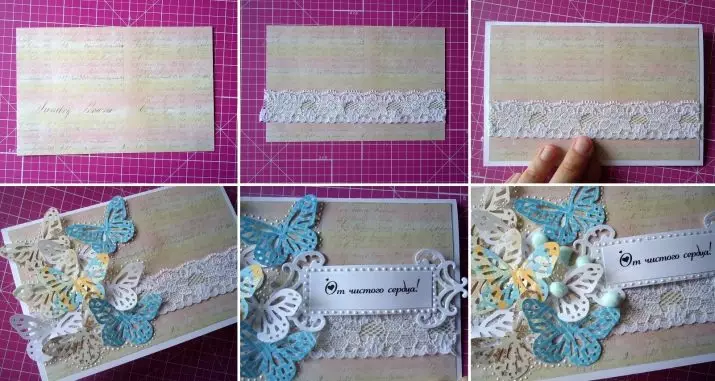
With cloth
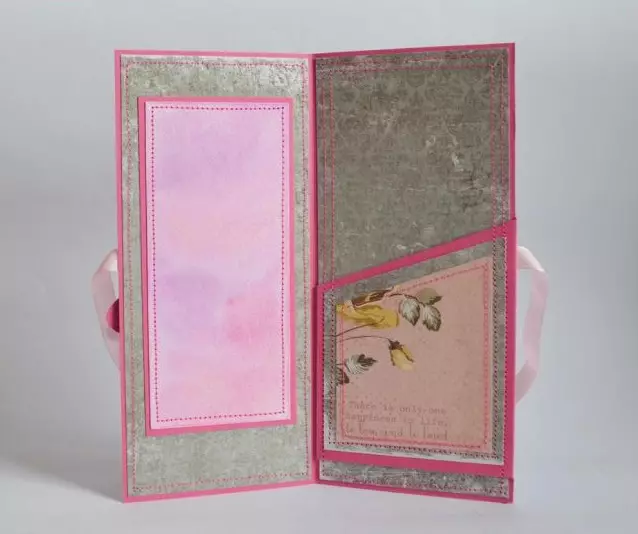
Pieces of fabric, ribbons and laces are perfectly suitable for decorating postcards, especially in scrapbooking. Such products look really gently and with this exquisitely. Working with lace perhaps even beginners: the suitable segment design you only need to fix on paper with colorless glue, while taking edges on the wrong side. And already this workpiece in turn glued to a cardboard basis. With lace, bows of satin ribbons, flowers or appliques in the form of butterflies are well combined.
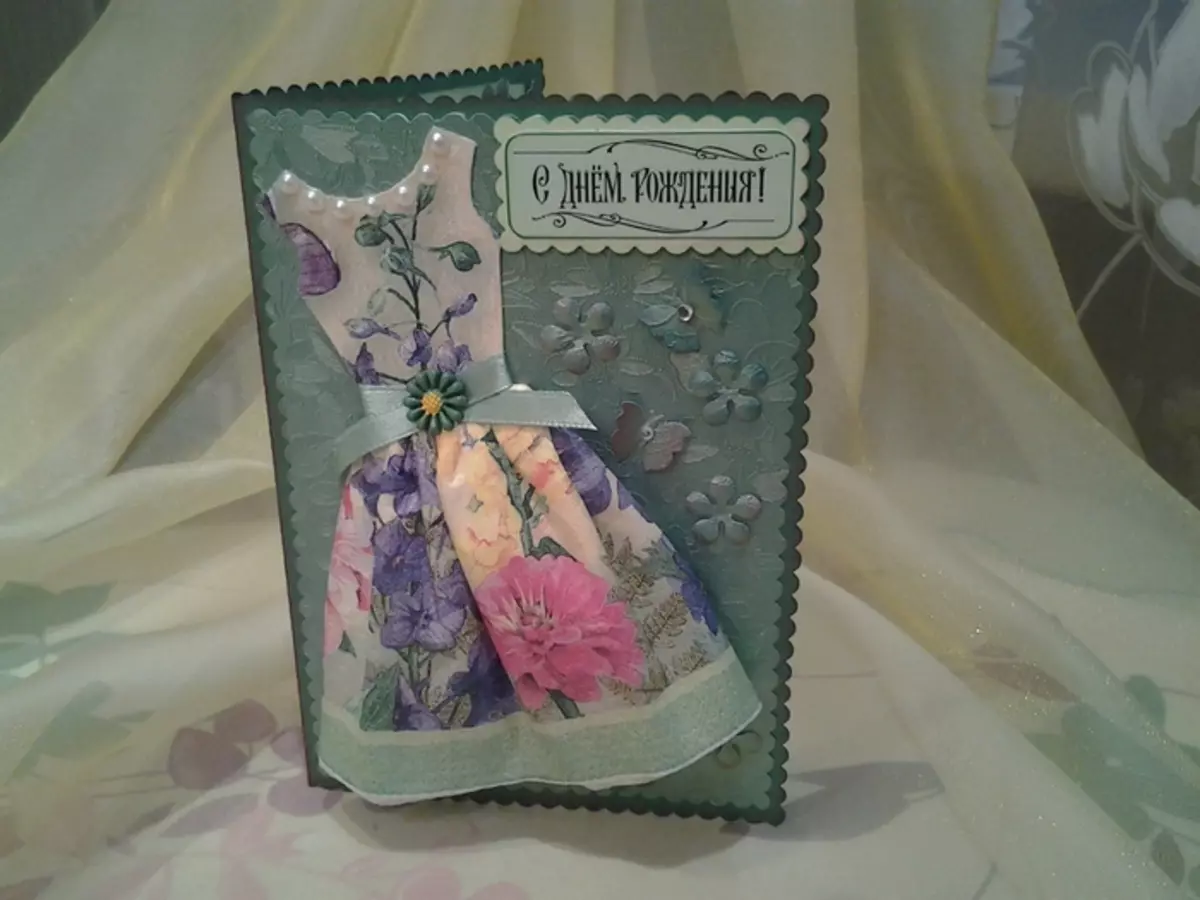
For girls and women of any age, it will be especially interesting to get a cradle decorated with a flirty dress. To do this, it is necessary to cut the foundation from the cardboard in the form of a dresses silhouette and enclosed suitable cloth. In order for the caretaker to be neat, the edge of the fabric dresses is better to wrap on the inside of the base. If the skirt must be volumetric, this item is cut out of the fabric separately and is not completely glued, leaving beautiful, lush folds or waves.
With confetti
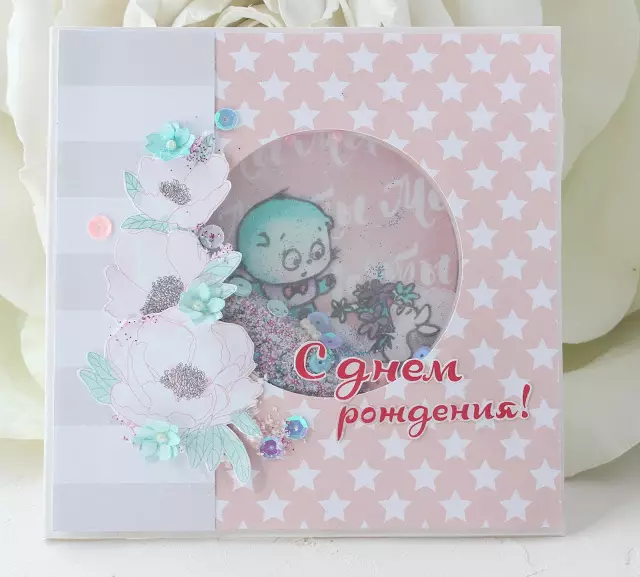
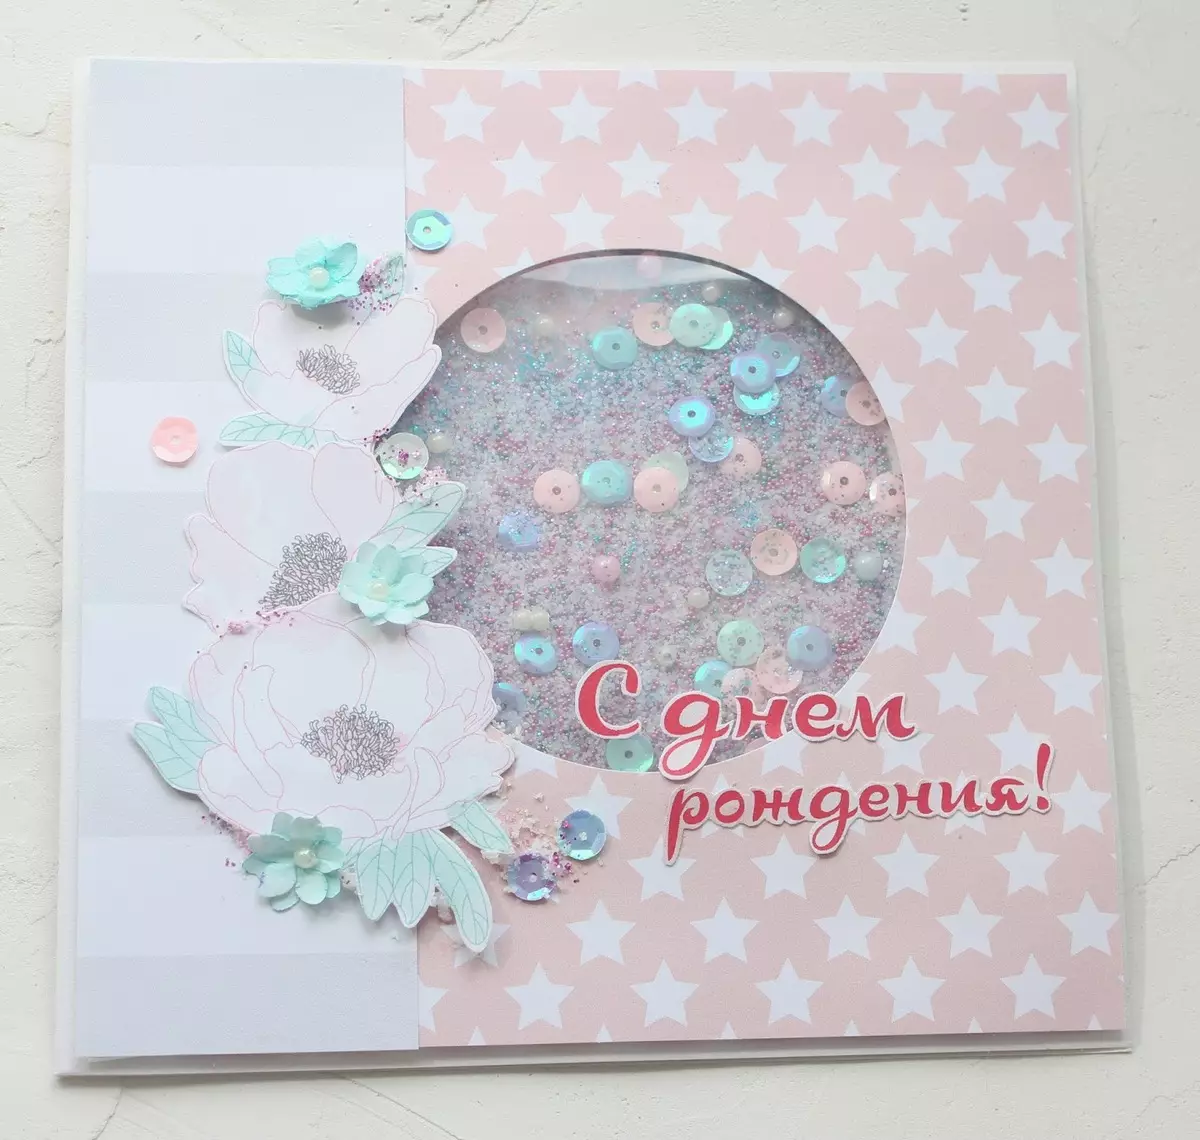
In order for the postcard to look unusual, it is enough to equip it with a shaker - an element with shocking multicolored confetti, beads or bright pieces of paper. So that work does not delay, all tools and materials need to be prepared in advance. The manufacturer's instruction is quite long.
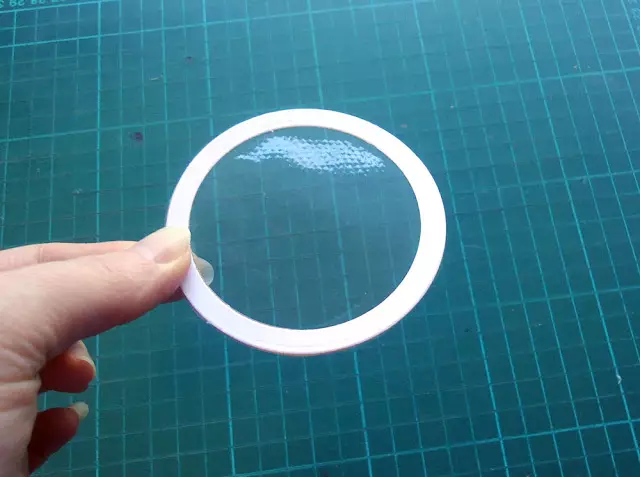
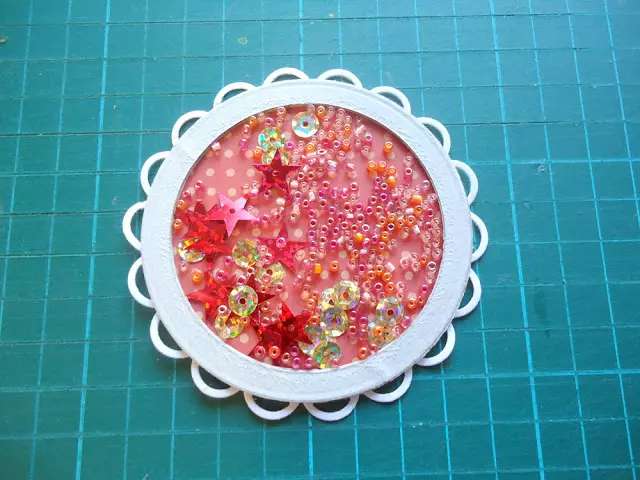
- You need to start with a shaker . On the dense base should be glued with a color circle - it will be a background for confetti.
- The shaker walls will be a stack of 4-7 cardboard rings equal to the diameter of the background . They need to gently glue and fix on the basis. The height of the walls depends on the number and size of the bulk material. Inside the resulting deepening, confetti falls asleep after complete drying.
- So that they do not crumble and were clearly visible, two more rings are needed, similar to those used for walls. They need to be lubricated with glue and place a transparent film between them. The protruding edges of the film carefully cut. The resulting cover to glue the basis with confetti.
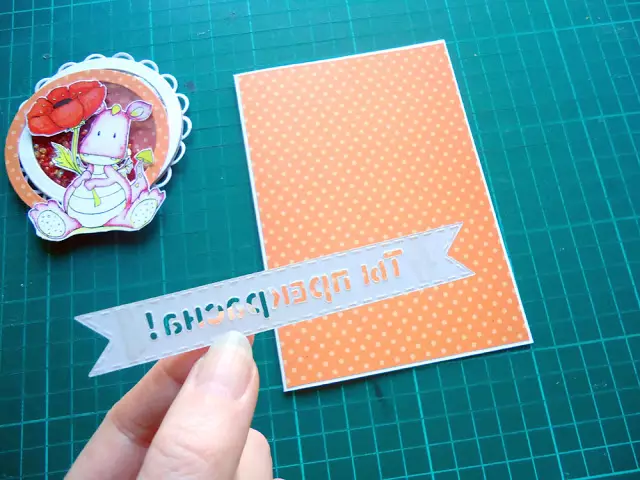
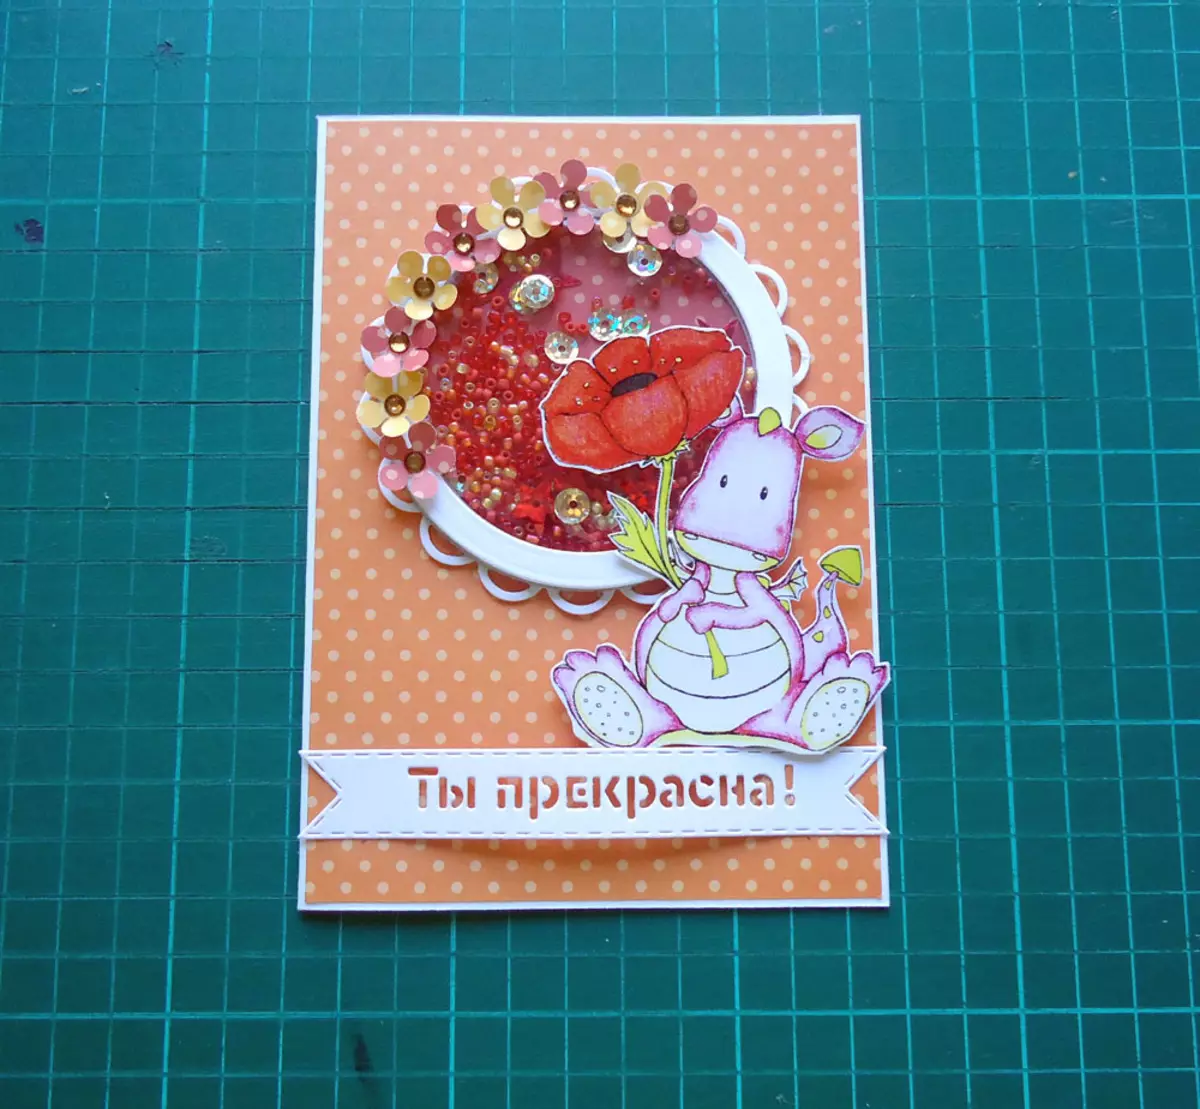
- Shaker decorate the front part of the postcard . So that it is more convex, you can stick a couple of additional circles from the cardboard.
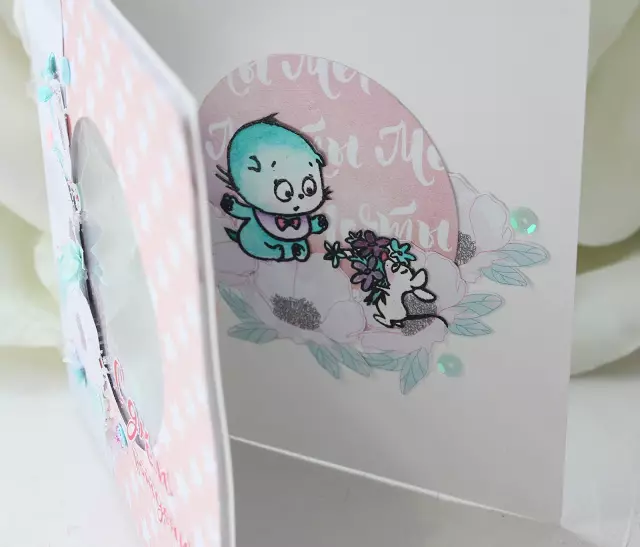
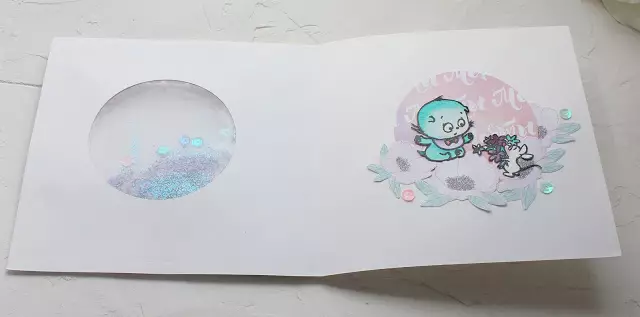
In order for the postcard to have a more traditional look, the hole can be made in the first page of the reversal, glue from the wrong side the transparent film, and already to it - a pocket with confetti or beads.
To hide the places of gluing, the second sheet can be glued inside the postcard.
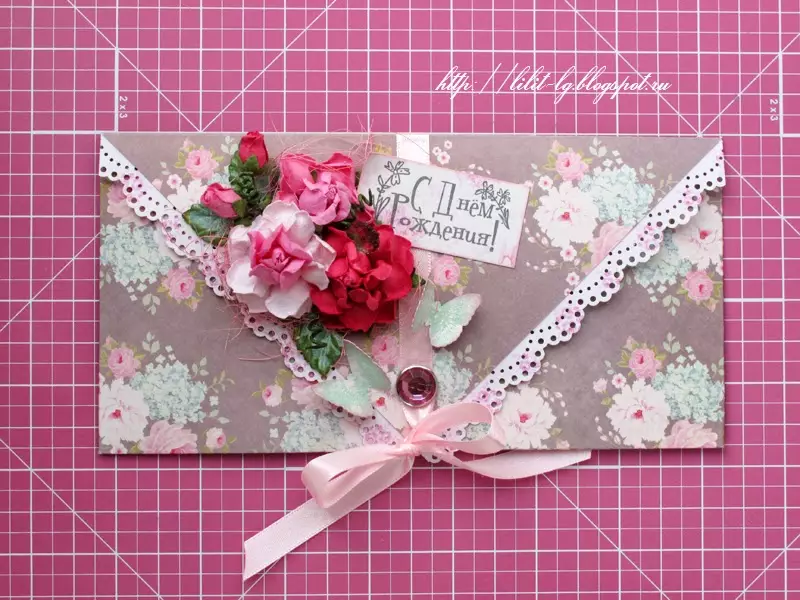
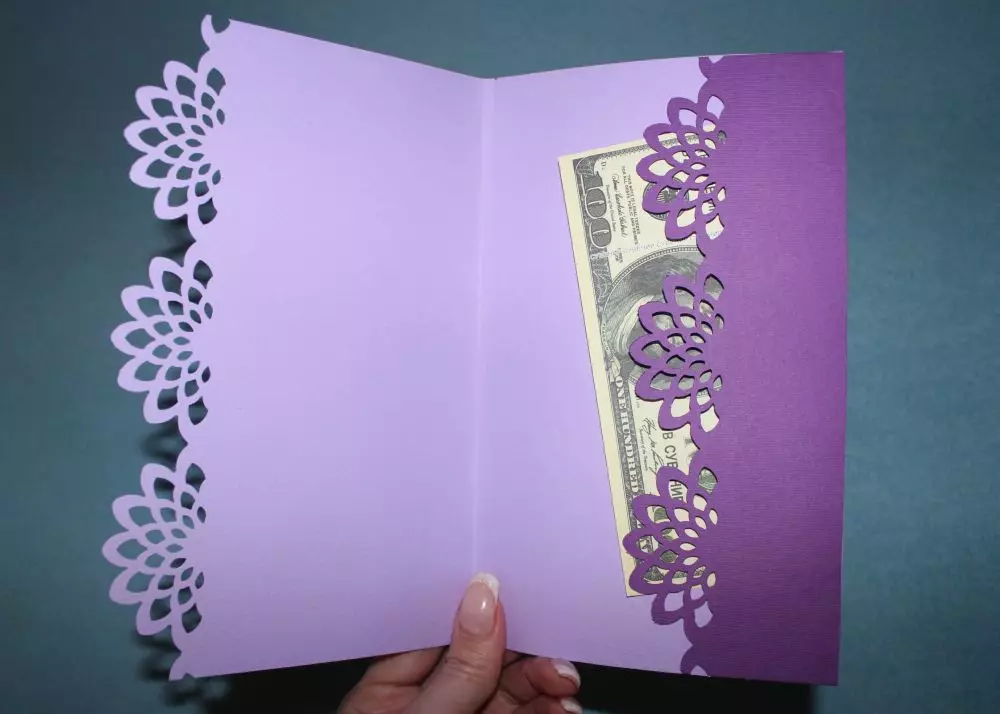
With envelope for money
Much aesthetically to give money in a postcard in the form of an envelope. It can be done with your own hands.
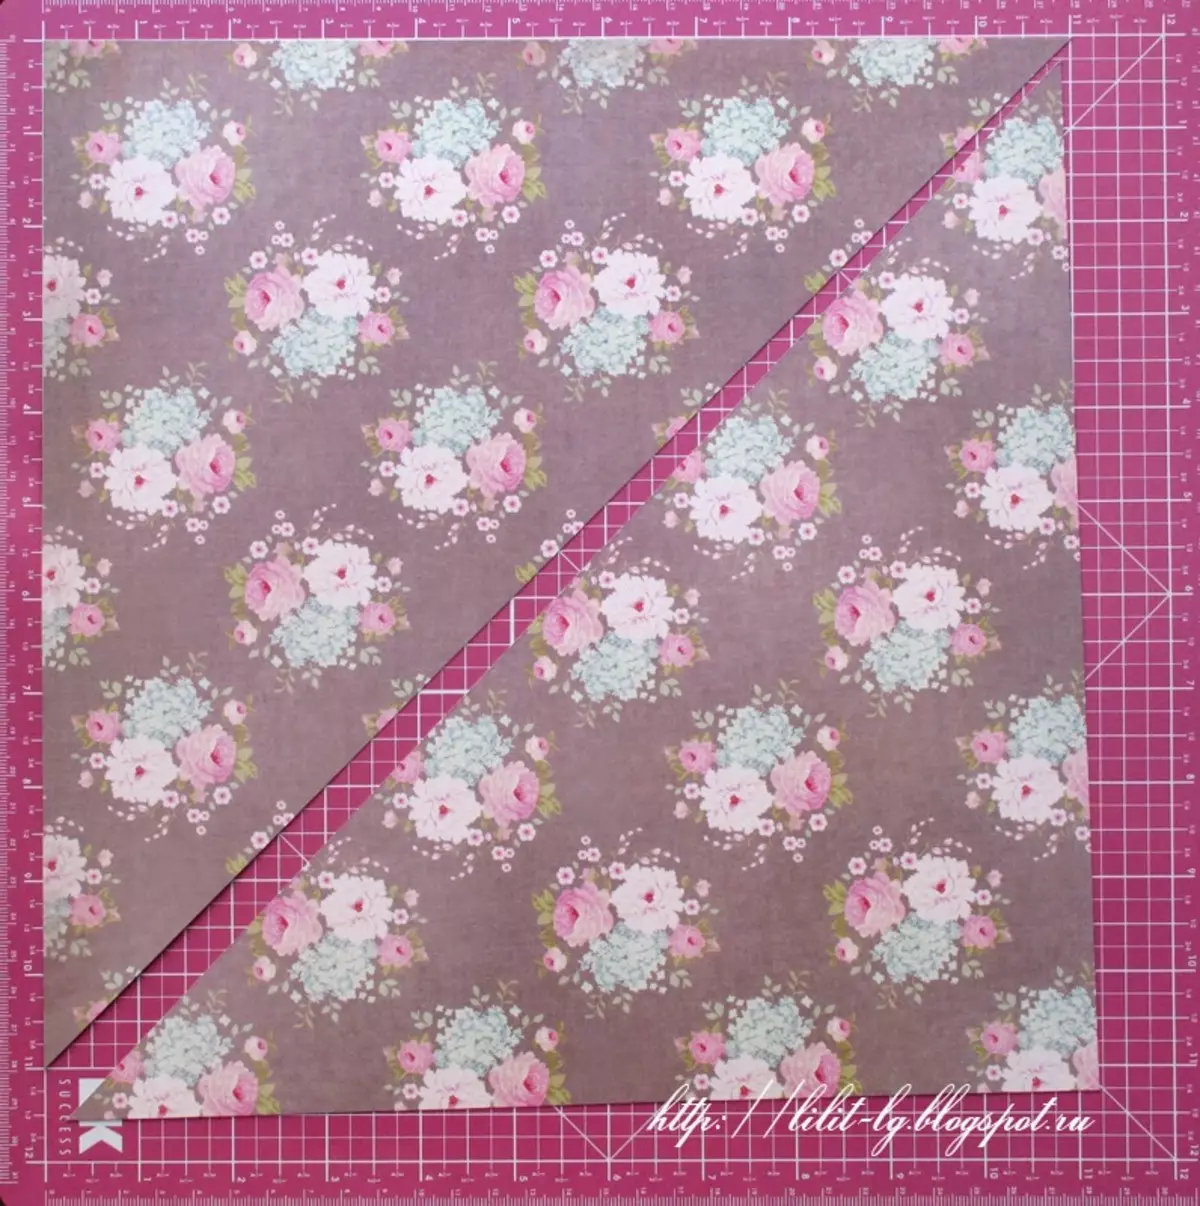
- It is necessary to cut from cardboard or thick paper triangle with side sides of 28 cm.
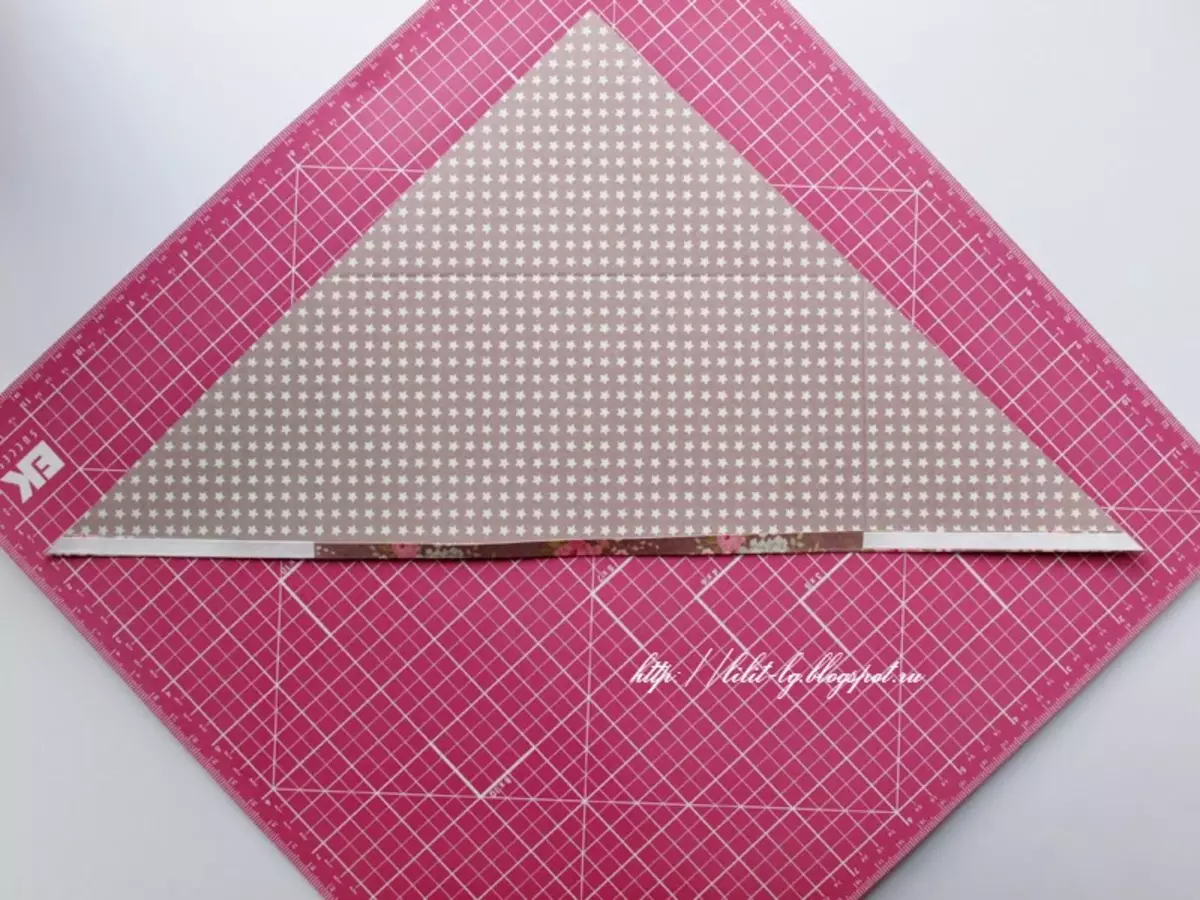
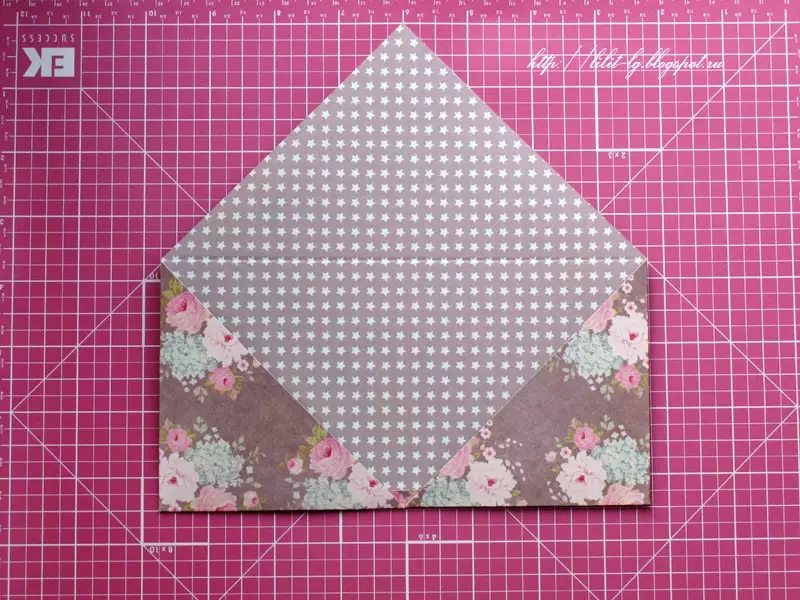
- Turn over with the invalid side up, then alternately bend to the center of the corner at the base. To make money did not fall out, it is necessary to take the lower cuts using narrow bands of bilateral tape.
- Then you should bend the top angle by completing the envelope. So that it does not open, on top and on the reverse side, you can stick the tape, the free ends of which should be enough for the bow.
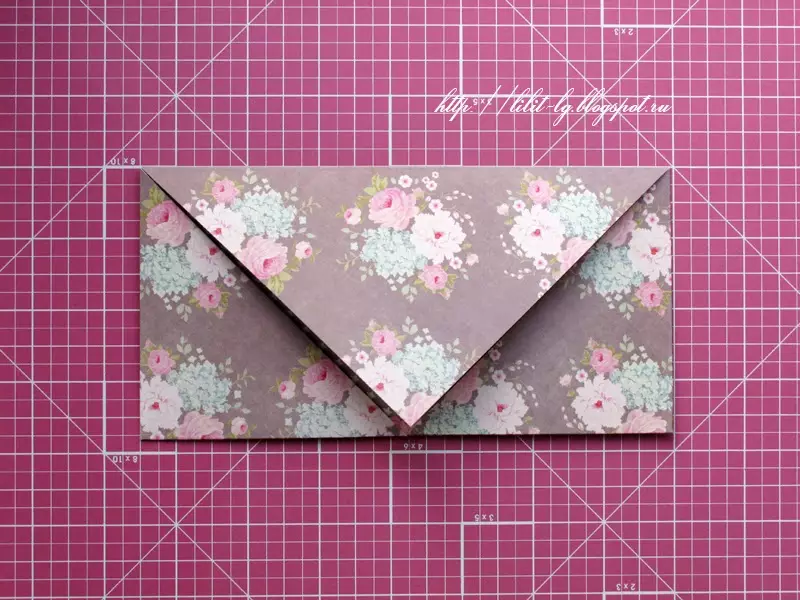
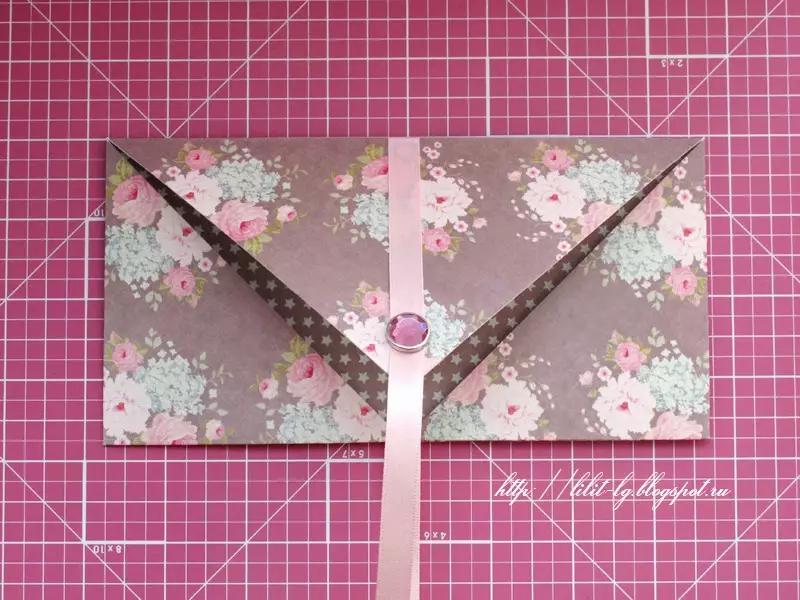
In order to express wishes, the insert is placed inside the envelope.
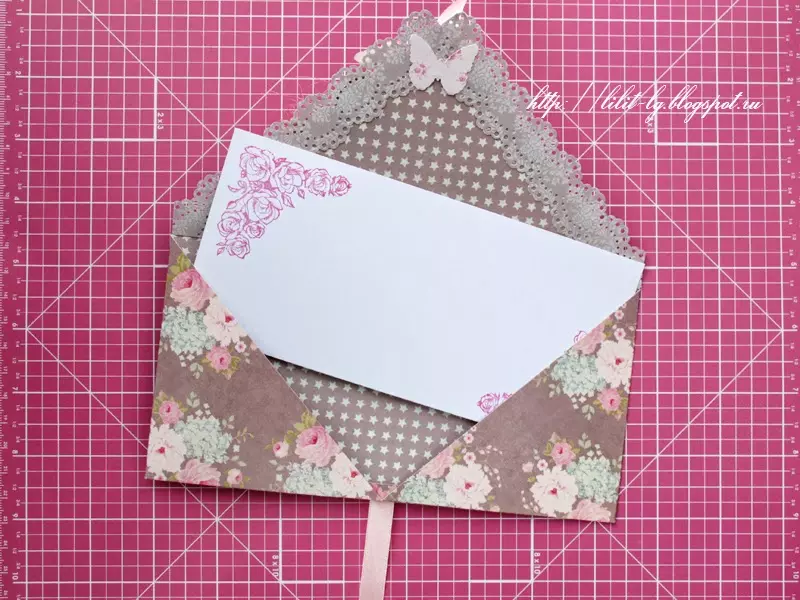
In addition to the usual envelope, you can provide various options for money pockets inside the postcard. To do this, when you want to add an allowance from the side or below, get it inside and glue the edges. Or make a pocket pocket - glue the item to the base so that the bills do not fall out, but if necessary, it was easy to remove them.
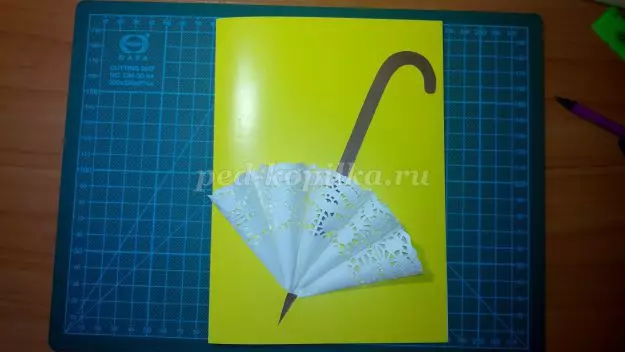
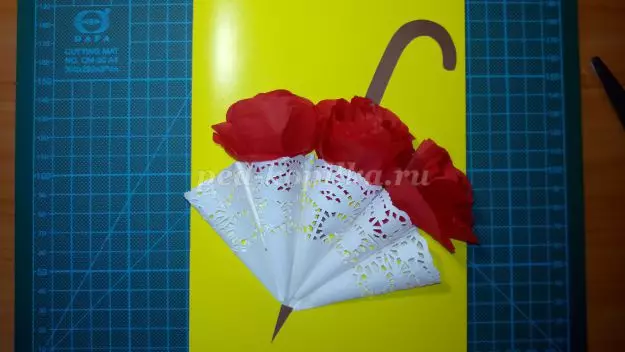
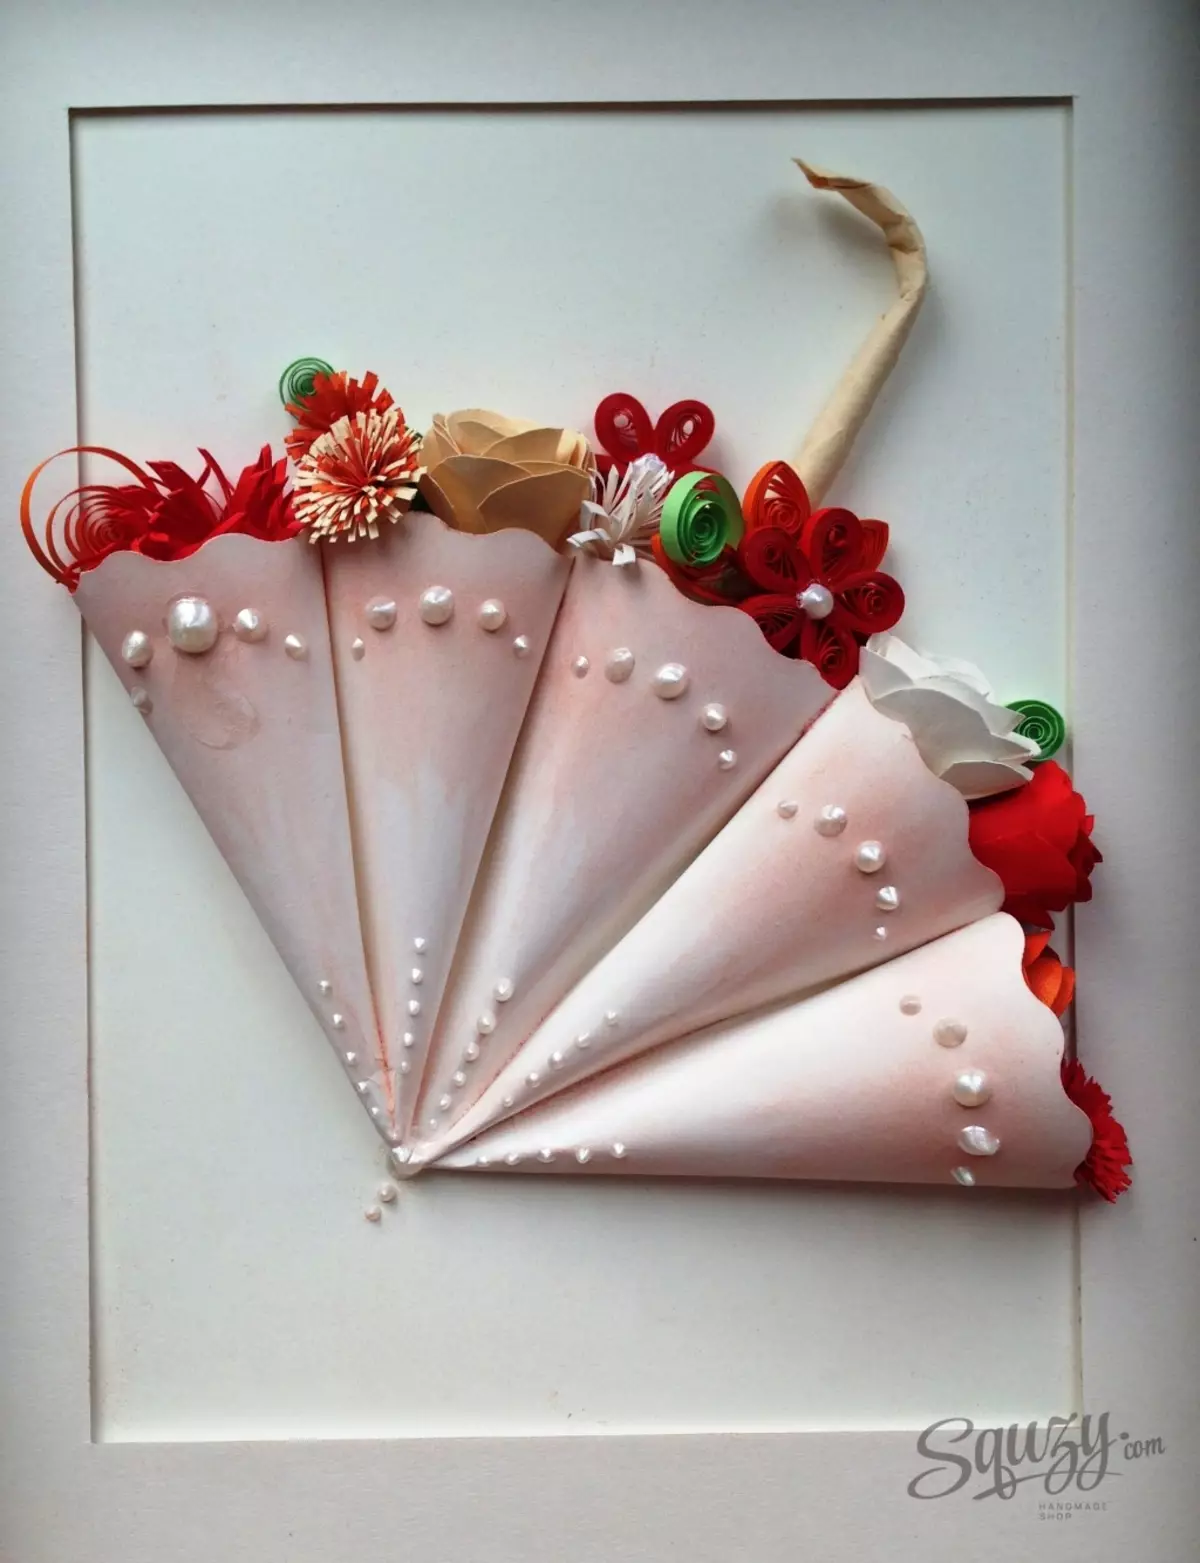
With umbrella
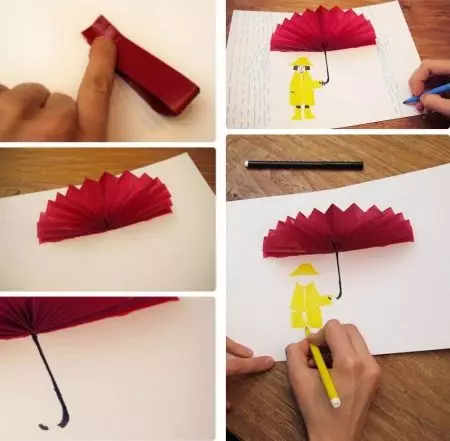
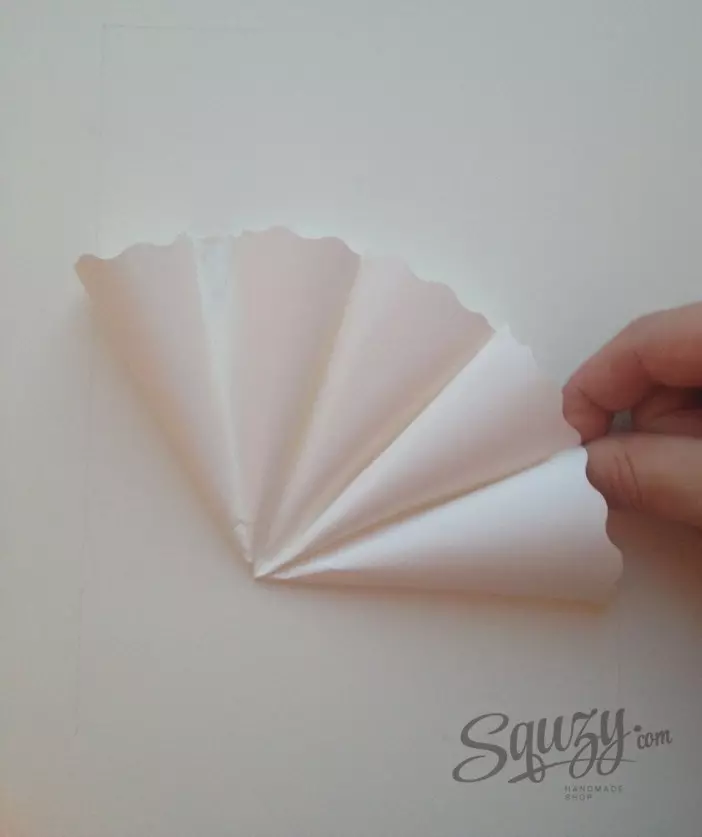
Crafts with hidden inside the umbrella looks funny and positive, especially if the reversal will decorate the plot pattern. Depending on its abilities, girlfriend and time, you can choose one of two ways. In the first case, the standard size postcard will require a rectangular piece of colored paper with a width of about 10 cm and a length of 15 cm:
- It must be folded along the long side in the form of a harmonica (alternately wrapping the folds on the facial and purl side);
- The workpiece should be overloaded and glued to the edges that were inside;
- The resulting fan is glued inside the postcard, neatly combining bends.
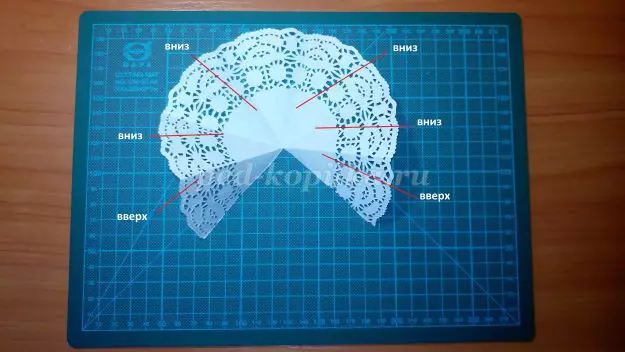
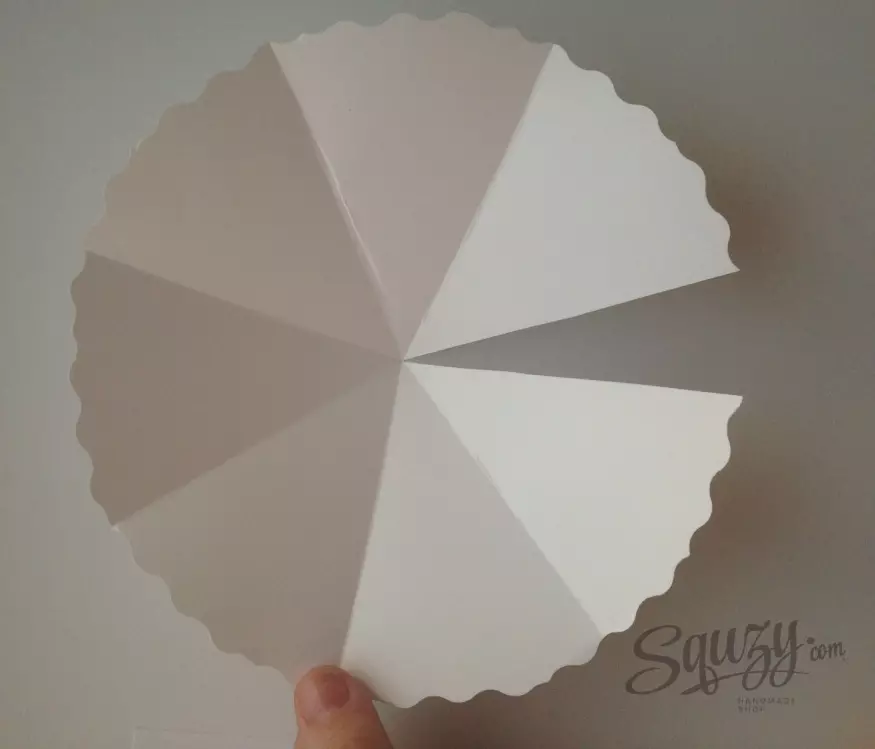
Beautiful lace umbrellas are made of round napkins.
- A napkin or a circle of fine paper must be folded three times in half to schedule. Thus, the circle should be divided into 8 parts. Then deploy, cut one sector.
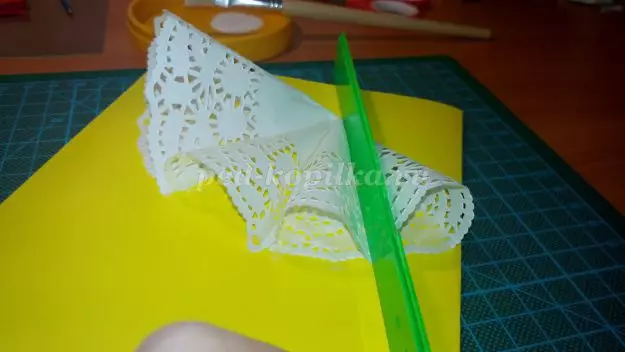
- Two extreme bends zaminate up, all the rest - down. The extreme sectors are lubricated with glue and glue the postcard to the front side.
- While the workpiece is stripped, we applied glue into four folds of the free part and alternately pressed to the postcard, forming the same pockets. We glue the handle and the top of the umbrella.
- After drying in pockets you can Insert artificial greens, flowers or borders berries.
If the above scheme seems too complicated, pockets can be replaced with cones of one size, rolled out of colored paper.
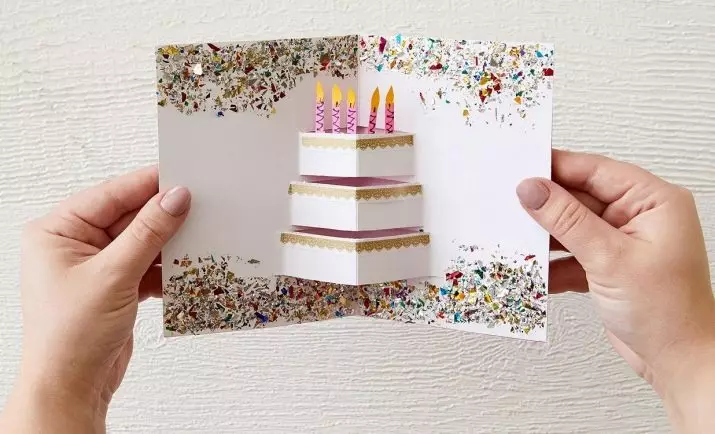
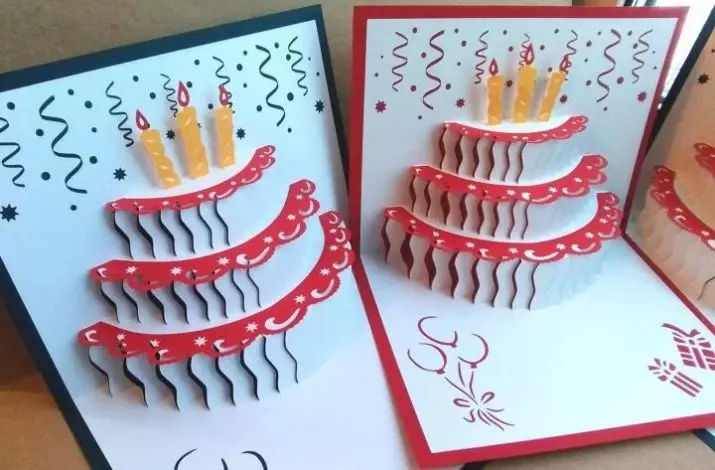
With cake
Birthday cards are traditionally decorated with a birthday cake. They are done almost similarly as the "transformer" with gifts described above.
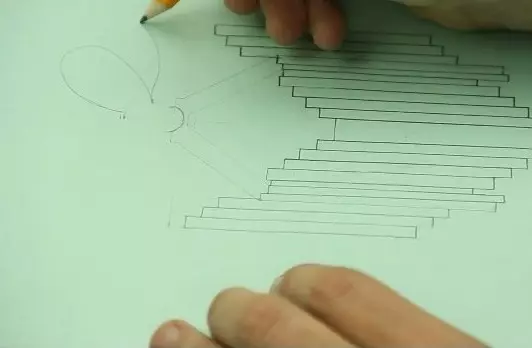
- In the first embodiment, the cake is symmetrical, from the fold of the sheet, folded in half, it is necessary to make transverse cuts . The lower two is the same, and each of the upper - one cm is shorter. And then the resulting strips bend on the inner side. Their quantity will depend on the planned cake levels. Candles upstairs is better to cut completely with the help of a stationery knife and on the unfolded sheet.
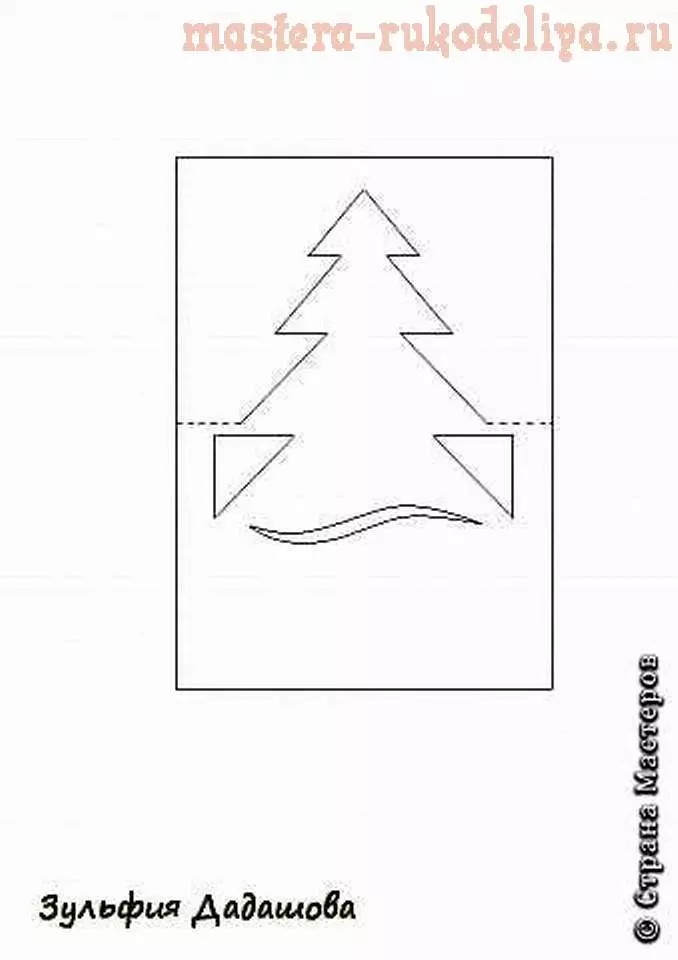
- Another way to make a postcard with a three-dimensional figurine of the cake is the technique of Kirigami. As an example, you can take a scheme from the Internet or develop it yourself. It needs to be neatly cut through the vertical, and then bend in places with horizontal lines. Postcards with complex schemes look spectacular, even if they are made on one white sheet, but if you wish, you can decorate them in any way - paste colored parts, lace or apply sequins.
Ideas for the day of lovers
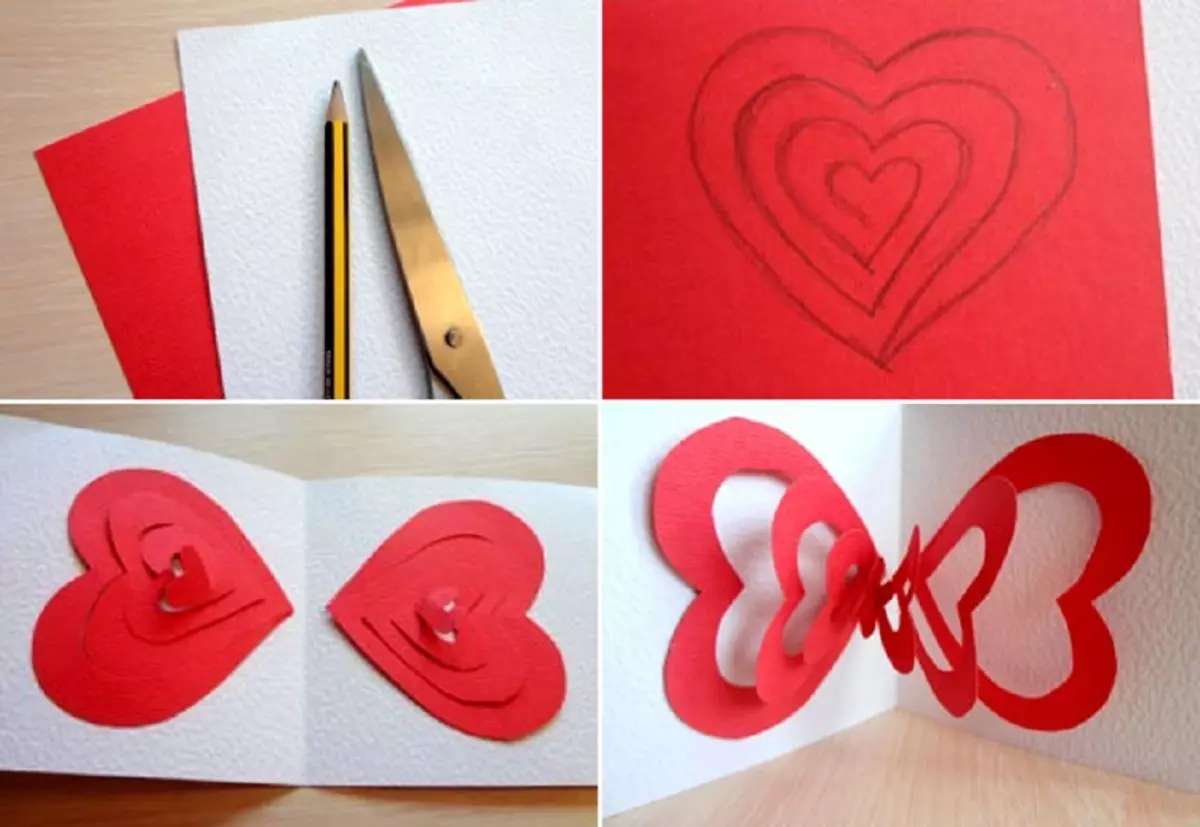
Valentine's Day does not work out without a gift of postcards, decorated with the corresponding symbolism - all sorts of hearts. Symbolic design can be placed inside the postcard:
- Cut from red paper heart and cut it like a spiral, ranging from the bottom angle;
- Two blanks to lubricate glue along the outer edge and place on each page of the internal reversal;
- To glue the central parts of the hearts so that when opening, they remain connected.

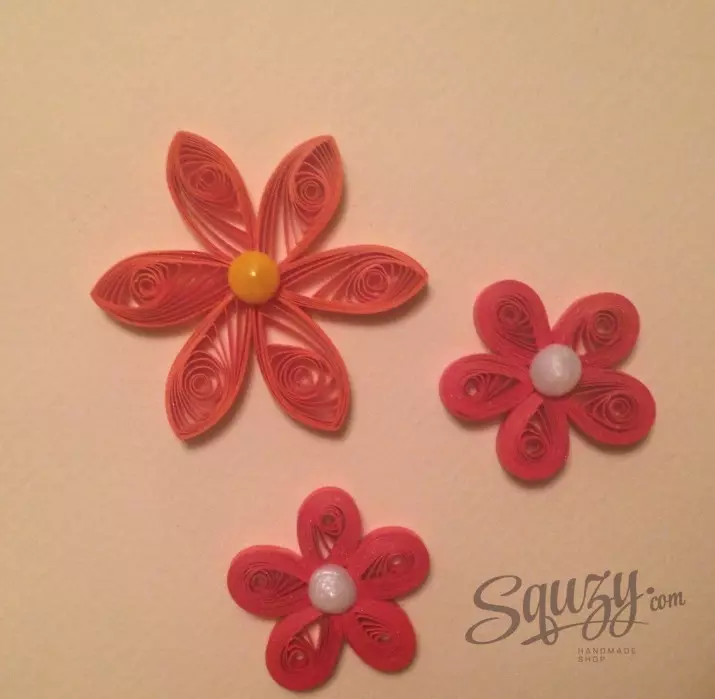
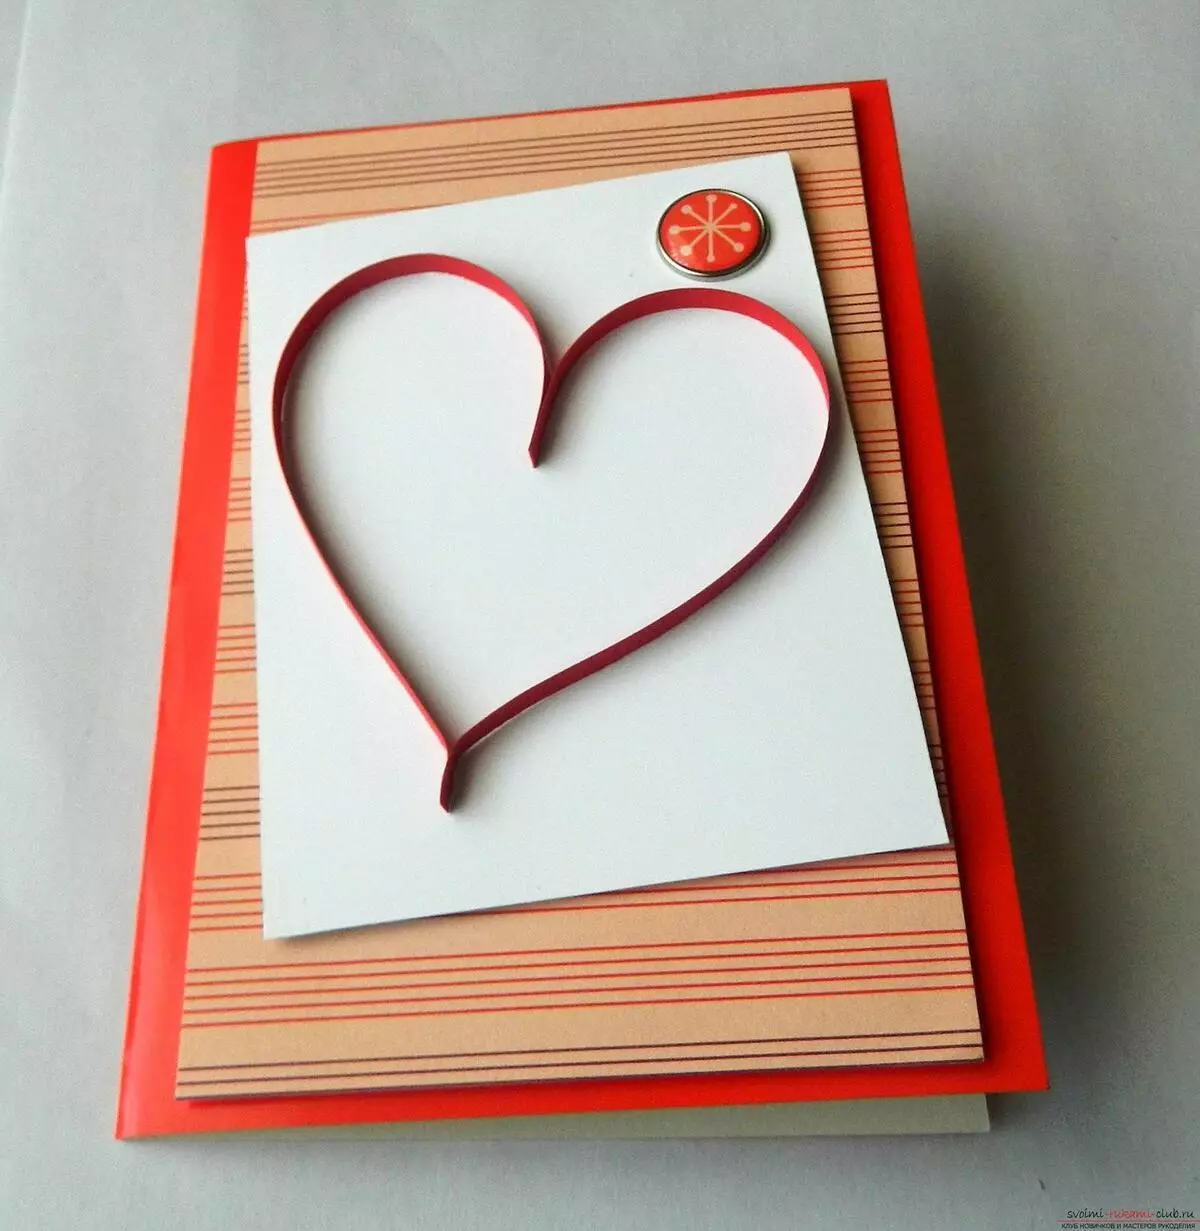
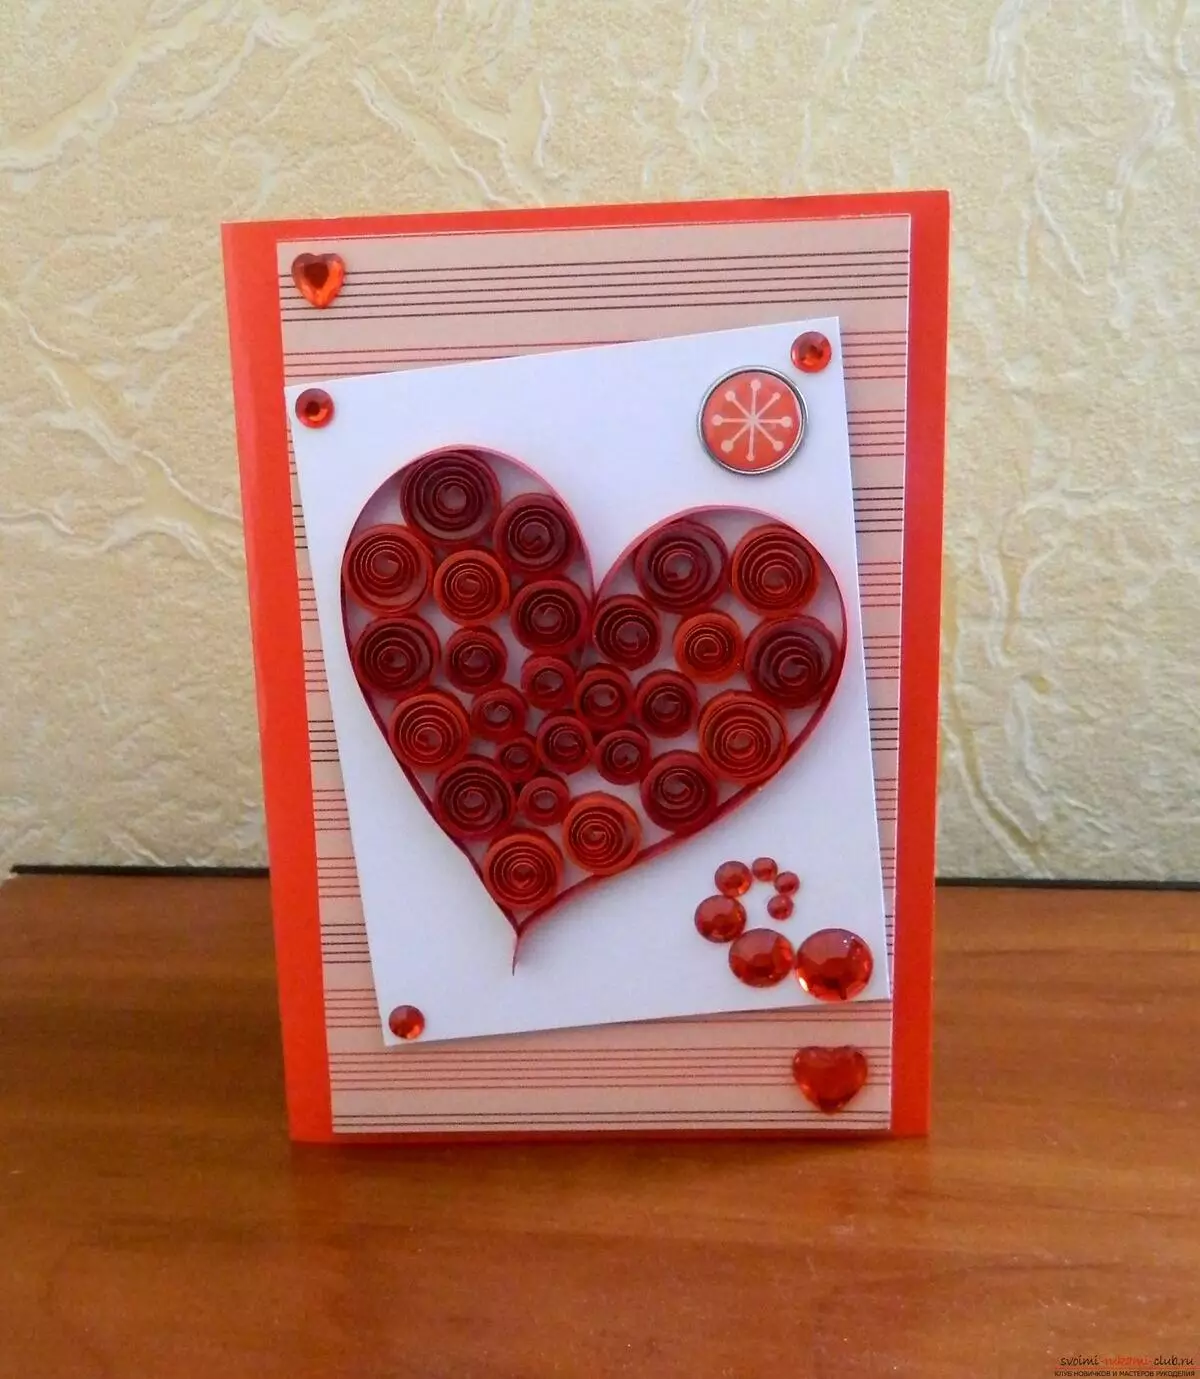
Making paper crafts in Quilling technique perfectly suitable for creating gentle valentines. To do this, prepare paper for queening, a list for a postcard and another, contrasting color, for the basis for which the blanks will be stuck.
- Start with the contour, for this you need to take a strip of red, Bend in half, then deploy in the opposite direction and secure glue so that the heart holds its shape.
- Using the tool for a queening or a thin rod, we twist the stripes, slightly dissolve and fix the edge. We glue in random order, filling the space inside the contour.

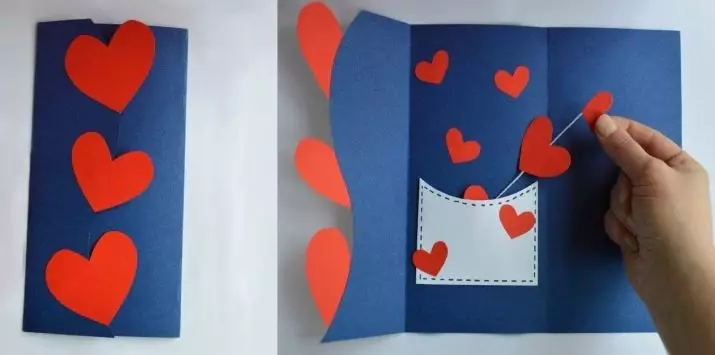
You can make a postcard with a secret in the form hidden inside the garland.
- The sheet must be bent into three parts, the upper of which should be a little already - its edge can be made wavy and decorate with hearts.
- On the thread paste the hearts, having them on both sides so that the garland looks more careful.
- Inside the postcard, on the middle, fasten the bottom tip of the thread, and the top is a paper pocket.
After drying, hide the hearts in pockets, leaving the most top one.
Options for March 8
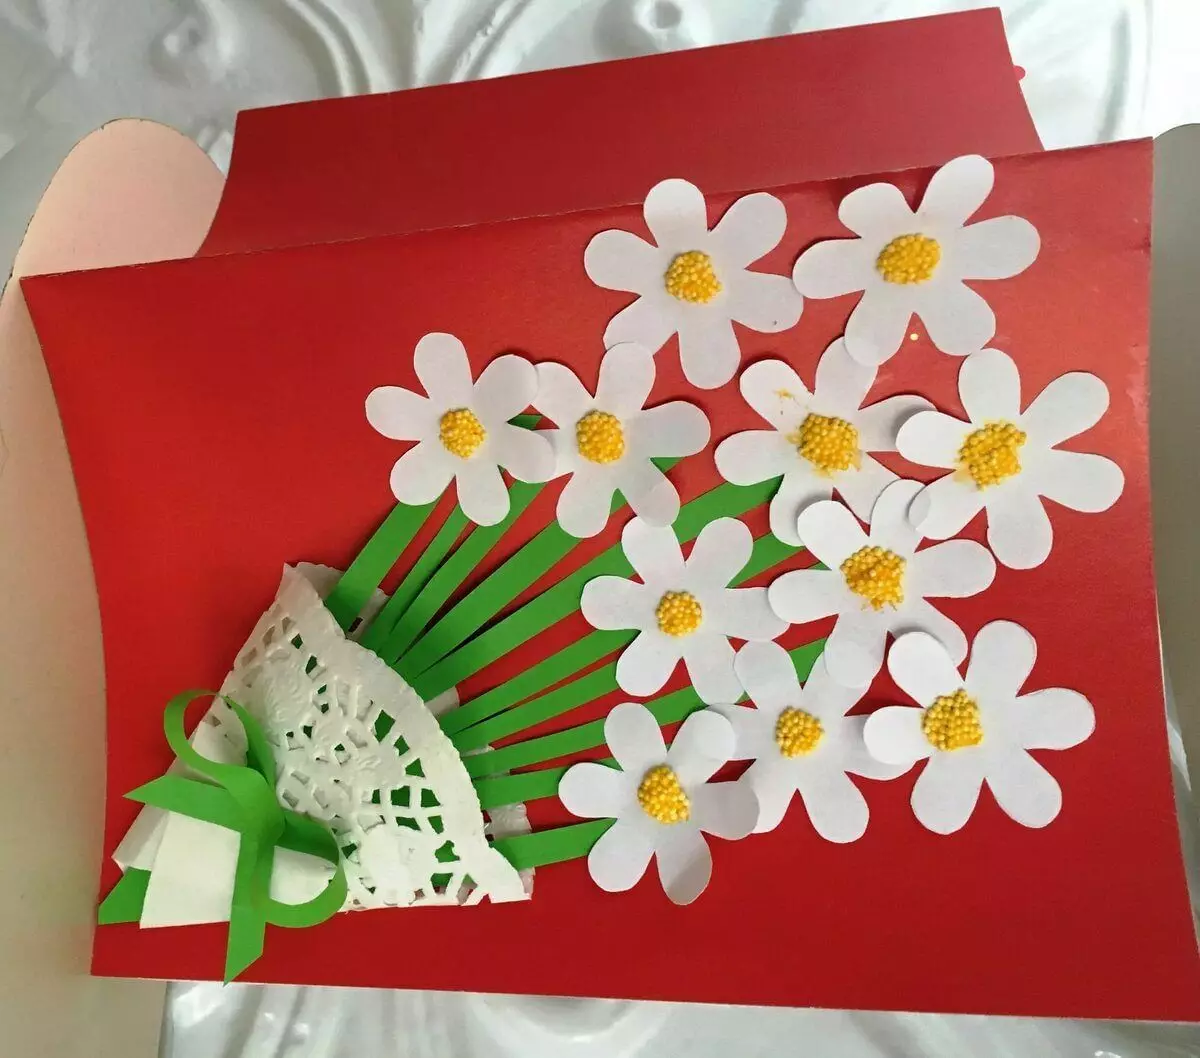
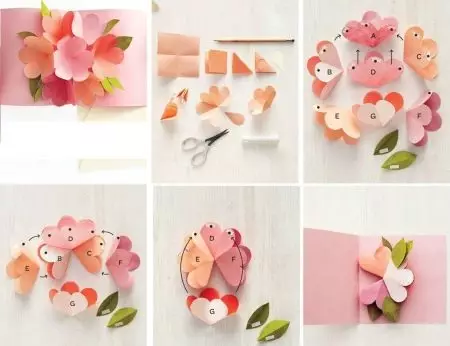
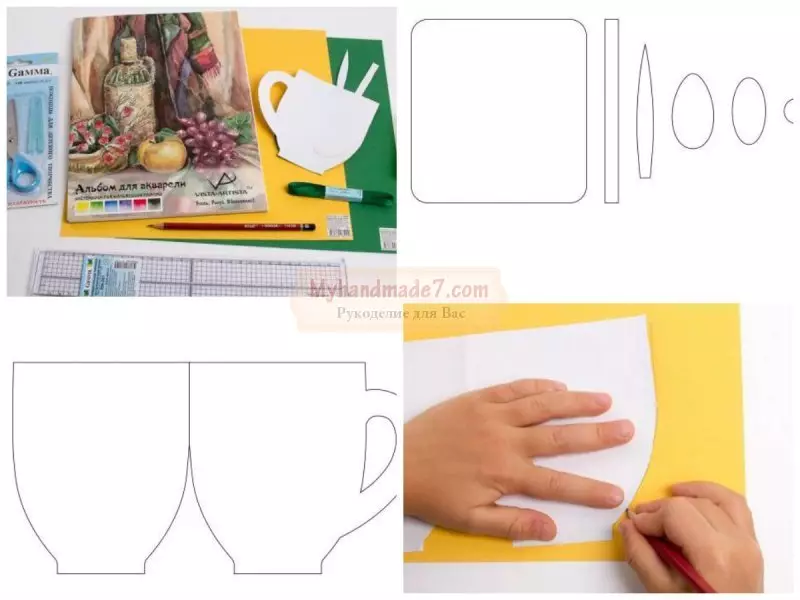
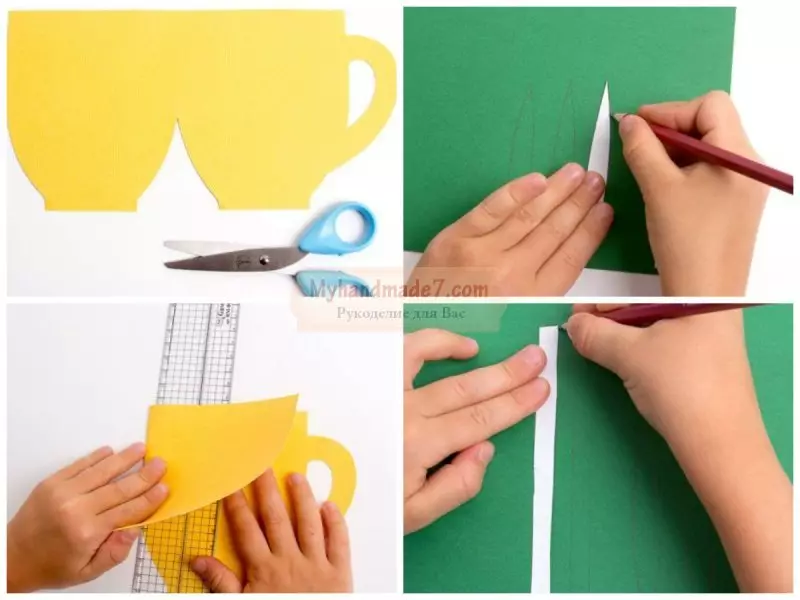
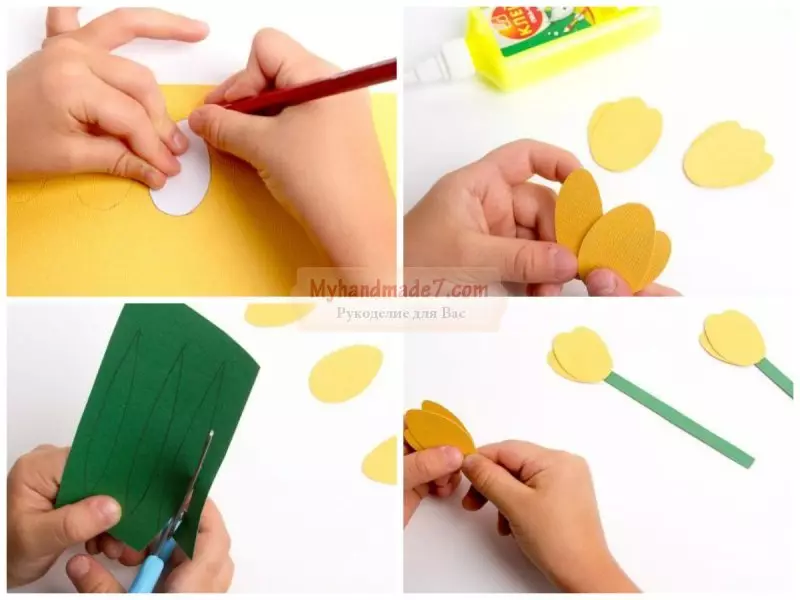
You can not get around the Spring Holiday - March 8. On this day you can always find anyone to congratulate - Mom, grandmother, sister, teacher, colleague. And of course, the most win-win option is all sorts of flowers - tulips, roses, chrysanthemums, chamomile. Master classes in their creation are found freely available on the Internet. Here is one of them:
- A small square folded twice in half, and then - diagonally;
- In the received triangle, it is necessary to cut the free edge with a semicircle to cut the free edge so that when the turnup is turned out to be a blank with 8 petals, one of them needs to be cut and glue a blank in the form of a funnel;
- Flowers stick not completely - for 2 or 3 petals, add twigs or leaves.
You can give a postcard the shape of a vase - then the flowers made in any available way, it is better to fix on the second page. For wishes, put a separate card. A skillfully created composition will decorate a room or a festive table.

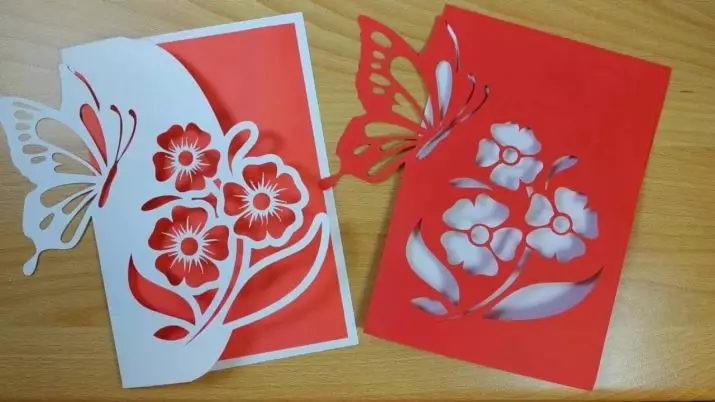
Unusually look out of the openwork pattern in the form of butterflies, plants, female silhouettes. This almost forgotten technique is now gaining popularity again - especially since the paper sheets are needed for creativity (white and color), a stationery knife and a cutting substrate. If a person has no artistic abilities, you can use ready-made templates.
Postcards on February 23 and May 9
Do not forget about the fathers, brothers and grandfathers, especially about those for whom the Day of Defender of the Fatherland is a professional holiday. Make a postcard with military equipment forces even a schoolboy. Step-by-step instructions will help it.
- Fold the sheet in half, and then the first page to bend back. To decorate it by the Russian tricolor and the laurel branch.
- On the inside stick the background of green. 6 cm width bandwidth bend in half along and make 6 identical shallow cuts. Ingub the cuttings on the other side, so that there are volumetric stands for equipment, glue in the middle of the postcard, aligning the bends.
- Stick on the protrusions figurines of any military equipment.
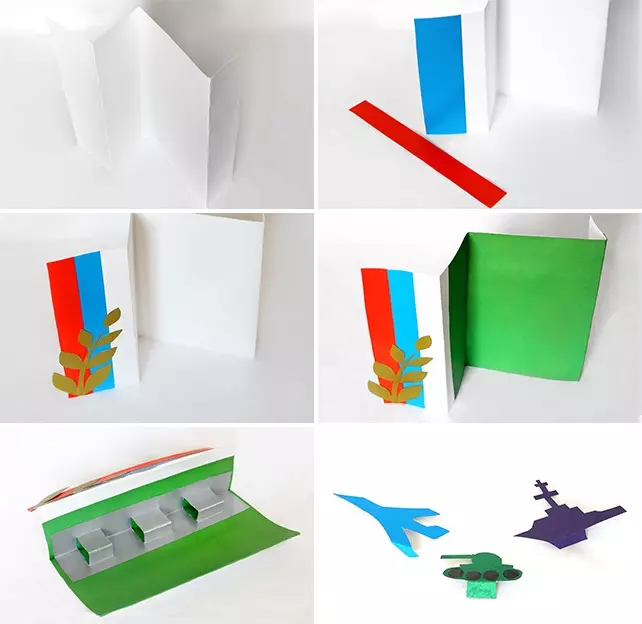
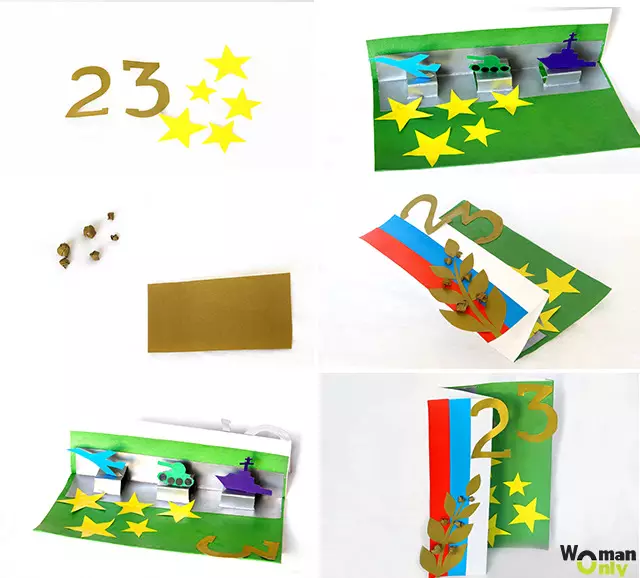
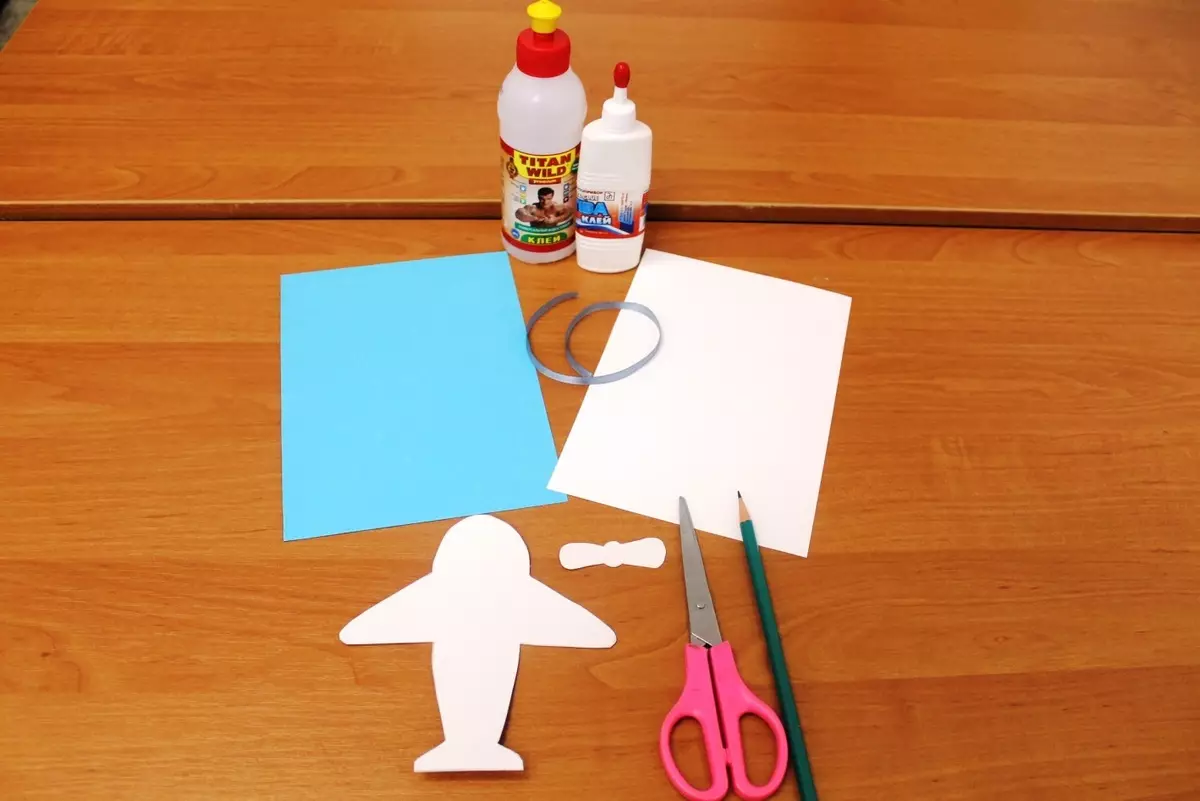
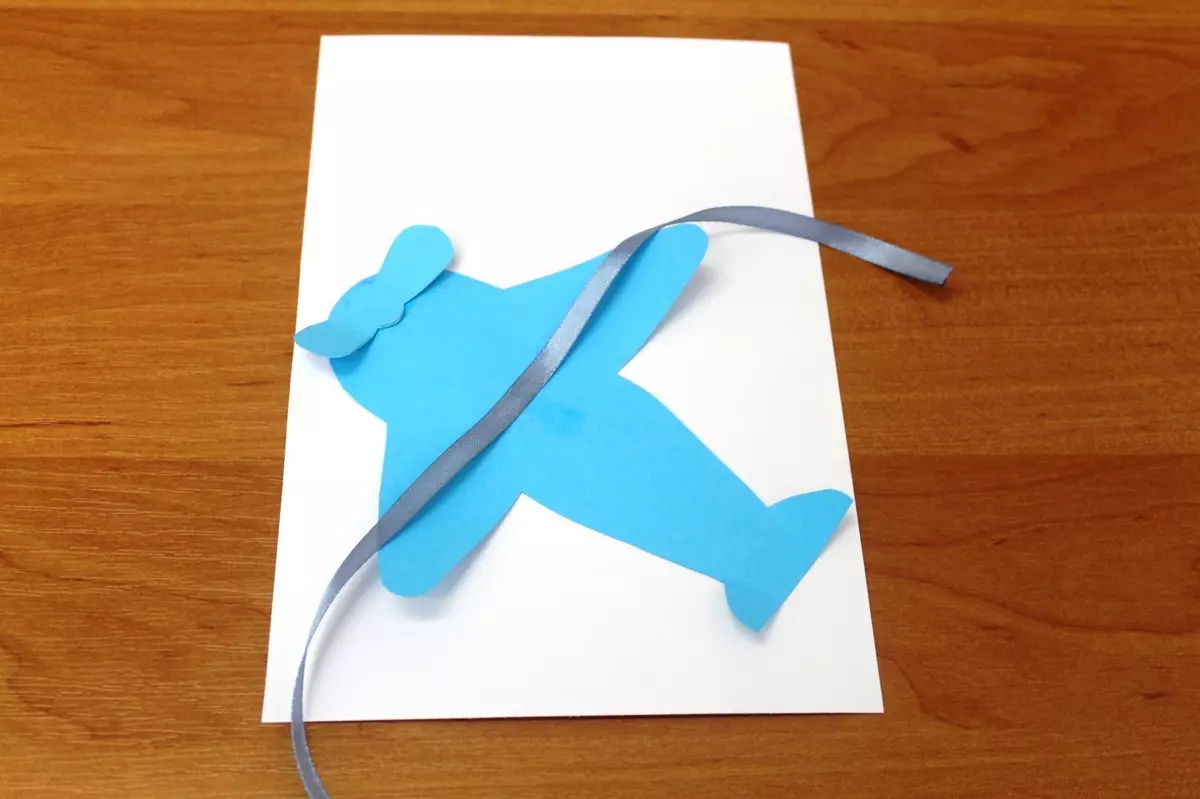
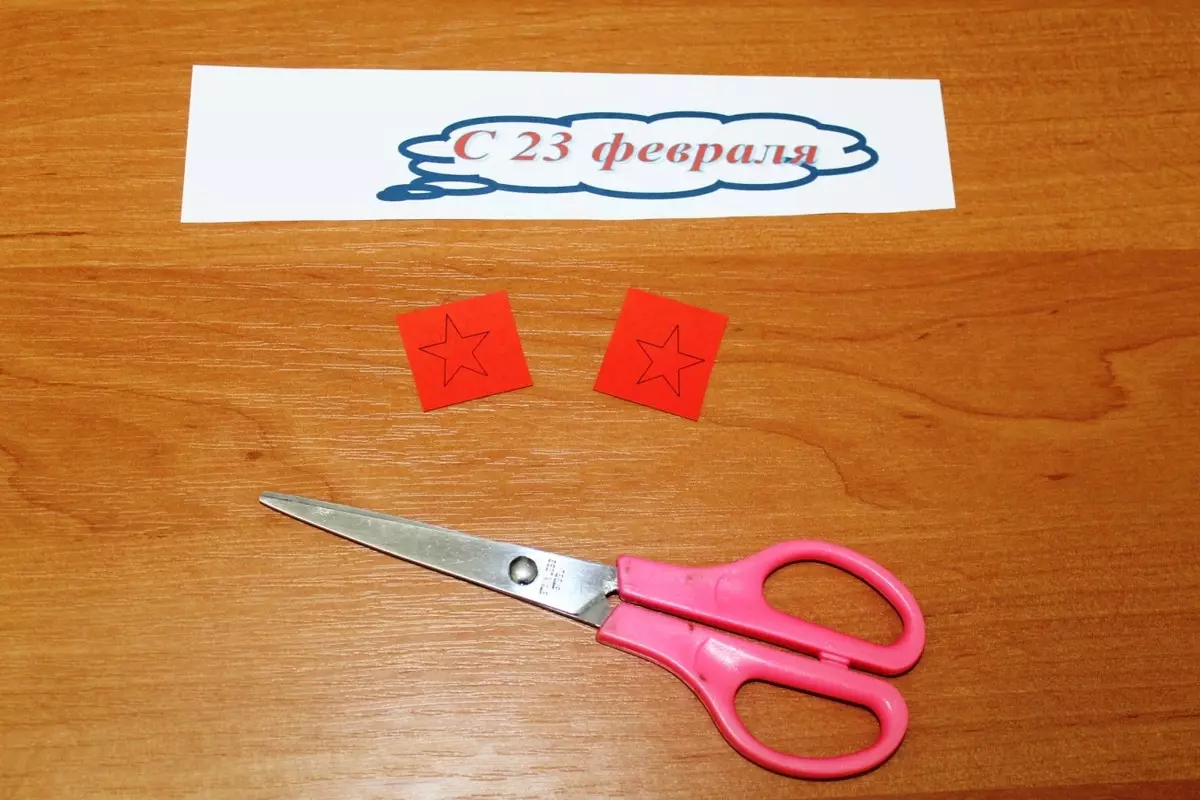
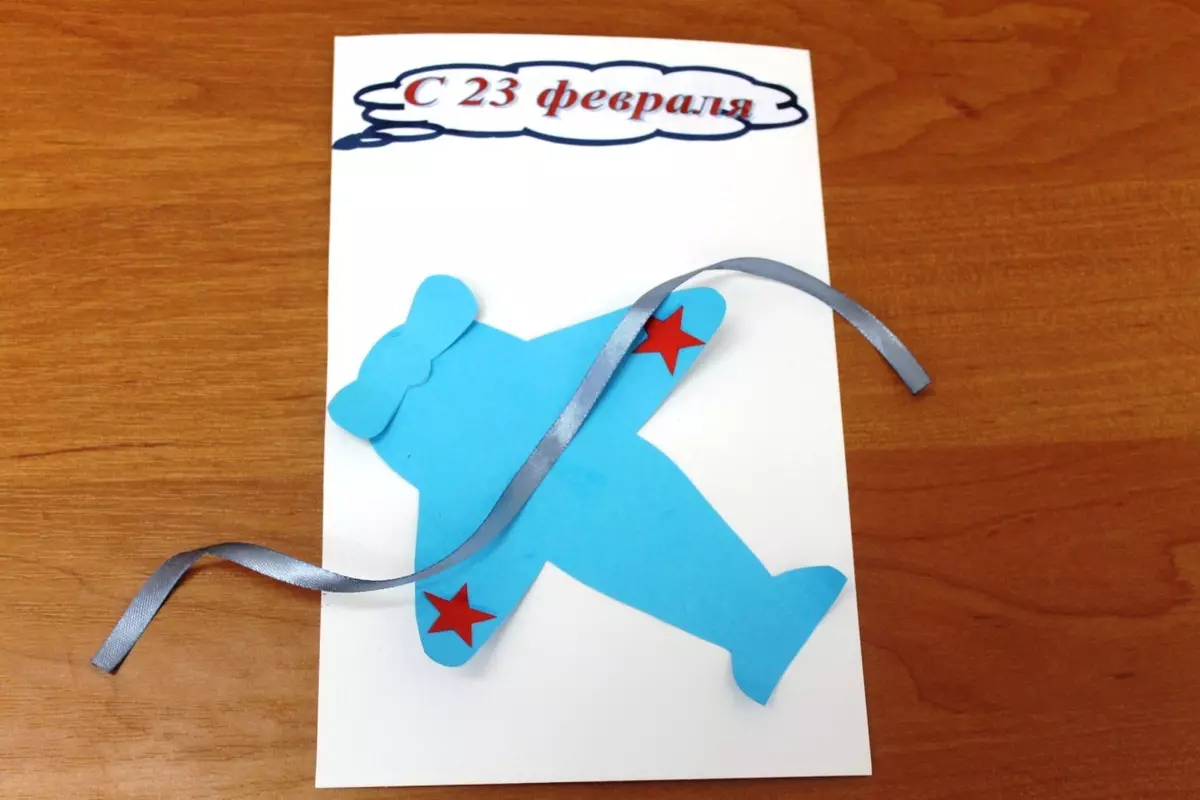
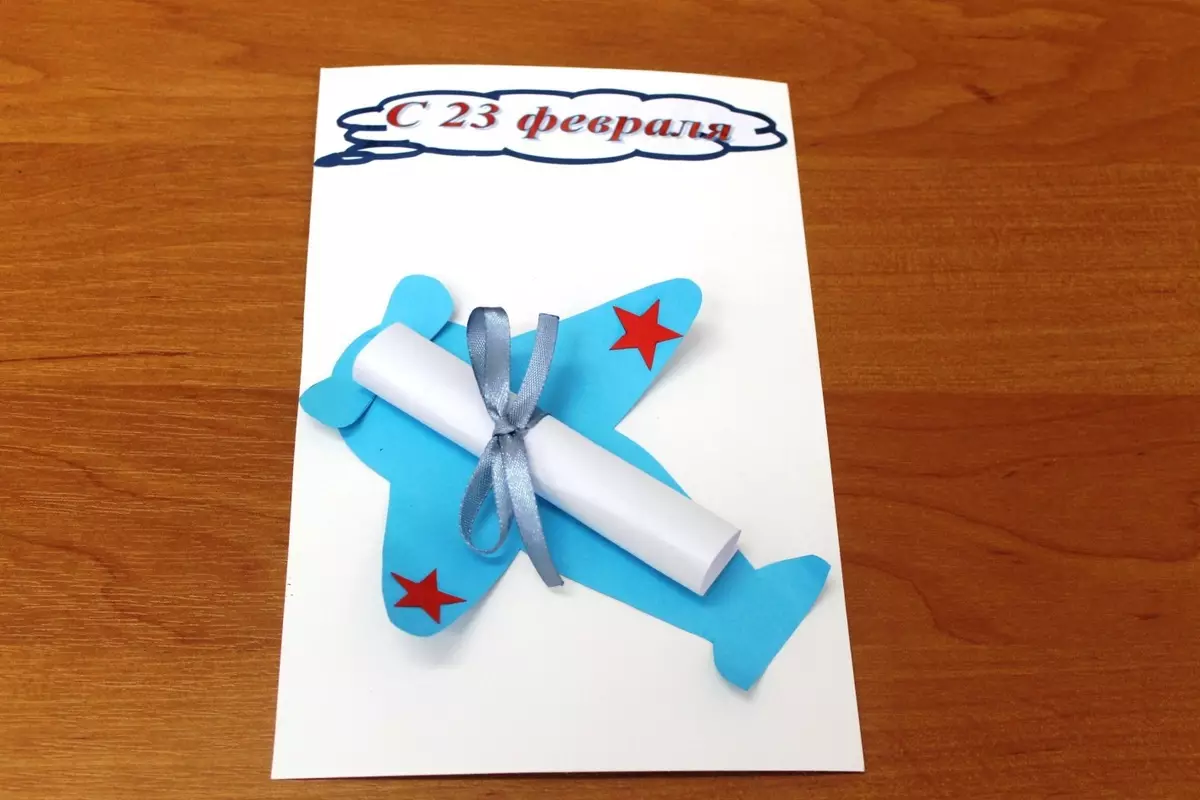
Another simple, but at the same time the original version of congratulations is to fix it on a postcard with a tape. To do this, cut the silhouette of the aircraft, the screw and stars for the wings. When all this will be pasted, you need to attach a satin tape with a length of 20-25 cm.
Congratulations are written on a separate sheet, which turns into the tube and tied to the plane.
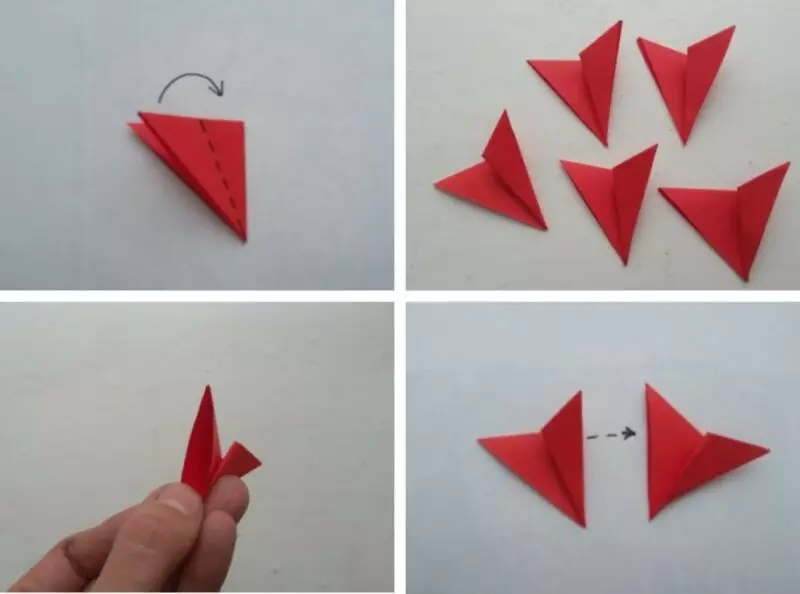
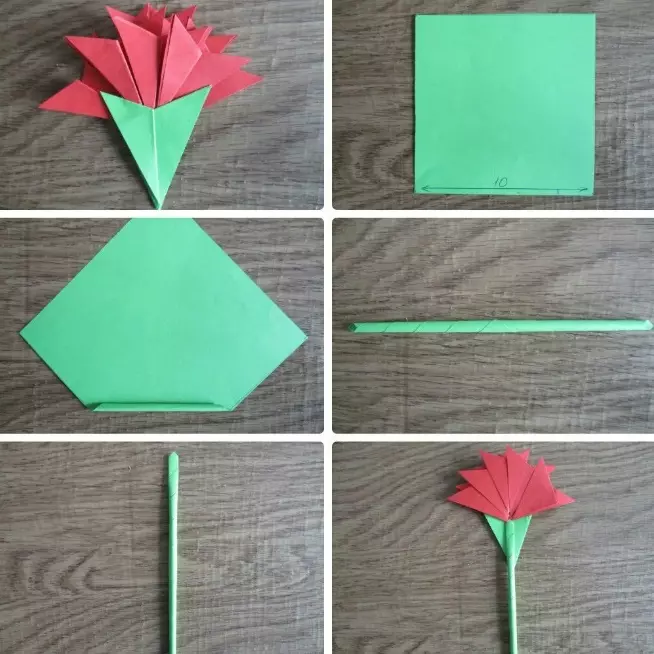
Continuing military themes, you can prepare for the next anniversary of the celebration of victory in the Great Patriotic War . In principle, you can use the options described above by changing the congratulatory inscription. Or reorganize the postcard with traditional cloves and the St. George ribbon. Carnations and stems can be made according to origami schemes. To make the stand under flowers, folded in half a list of postcards must be cut across, lean the lower part of the message, and then exacerbate in the opposite direction. At the end, stick the back turn, decorate with ribbon and inscription.
Other beautiful products
All sorts of postcards with warm wishes is made to give each other in New Year holidays and Christmas. Since such postcards need a lot, the most popular are fast postcards, such as those that can be cut on the stencil and decorate sequins from above.
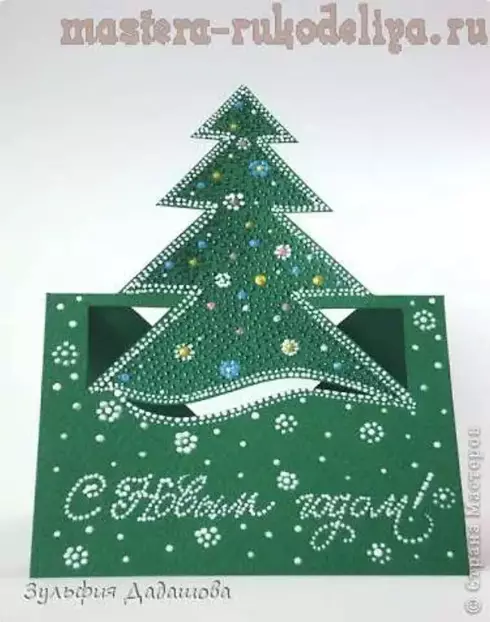

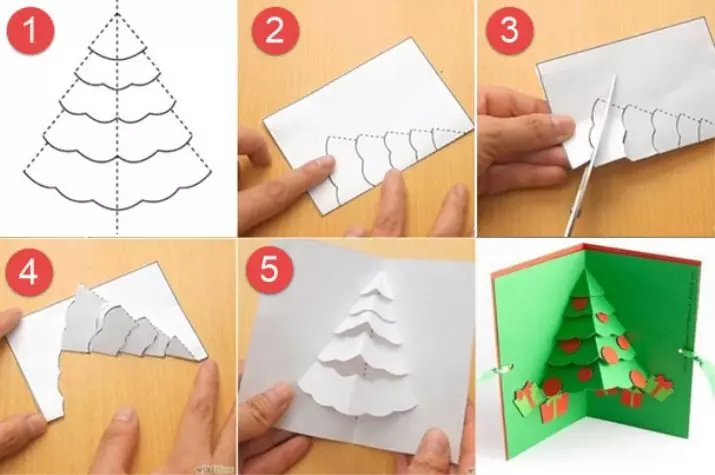
There are also many options with bulk Christmas trees that can be cut, folded or stick, it is worth only to show fantasy and store the necessary materials.
Modern, stylish postcards can be made on crafting paper. Cut the base of 10 sizes to 12 cm and decorate with inscriptions, cutting, chipboards, cords, beads - to all that suitable for a common idea. To save time, drawings are better applied through stencils or stamps.

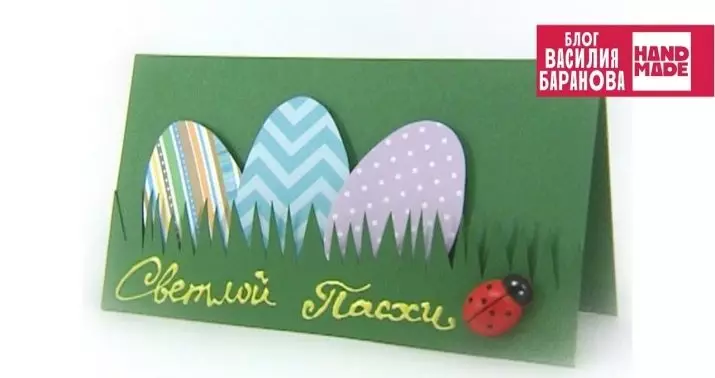
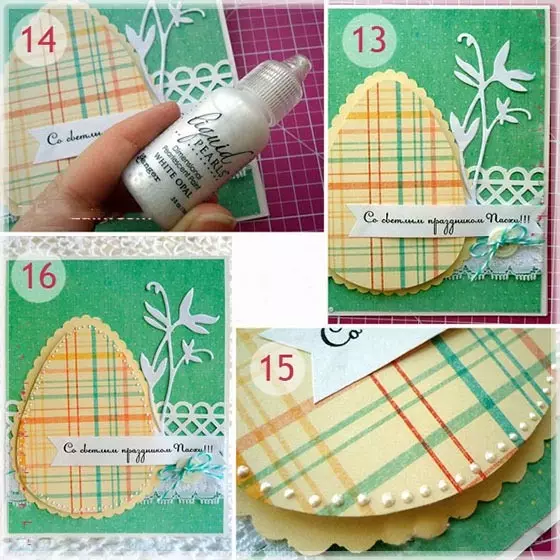
In preparation for Easter, it is necessary to include the creation of crafts, which can be started with the whole family. Preschoolers and younger schoolchildren can make a postcard with the edge of the edge of the edge, which neatly placed eggs, cut out of paper with patterns or manually painted.
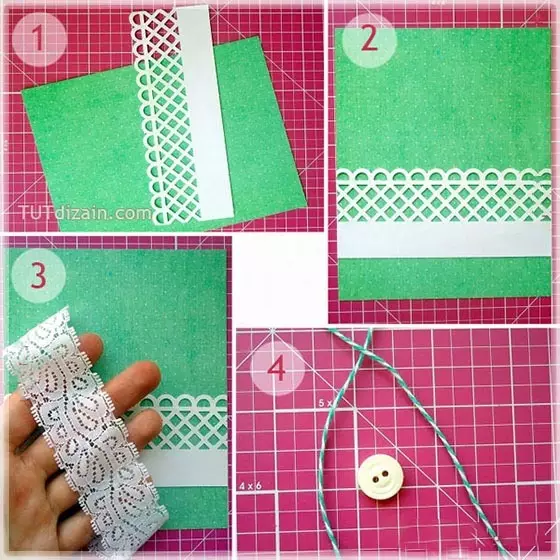
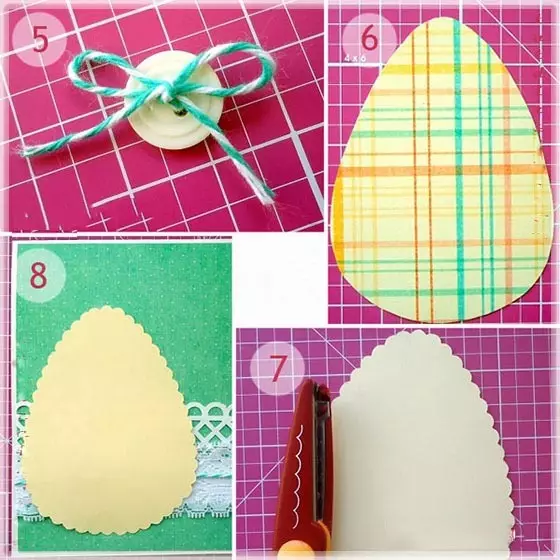
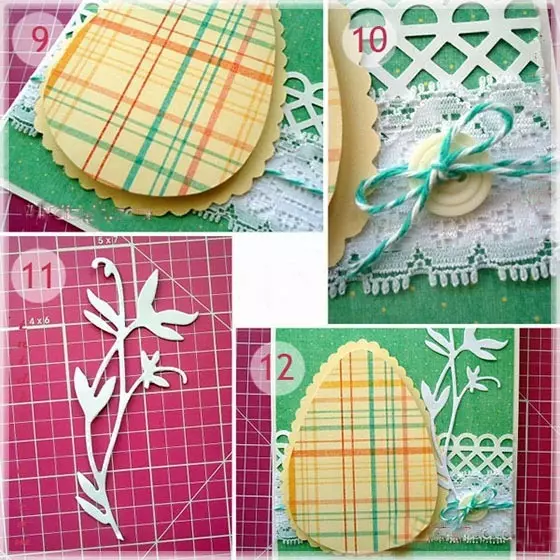
More experienced you can try scrapbooking: stick-paper lace, colored cord and egg on the substrate with a curly edge, all this is glued to the base, and then fill the space button and cutting in the form of a flower. In Easter cards are often present bright figures of rabbits, chickens, spring flowers and greens.
About how do it yourself make a bulk card with flowers, see the next video.